


Introduction
20
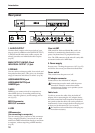
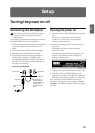
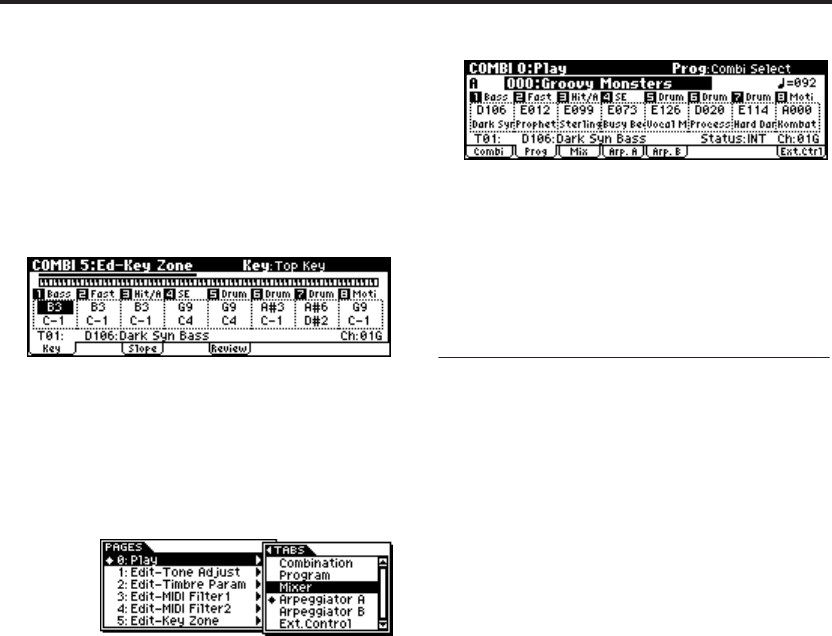
2. Use the ClickPoint [√][®][π][†] to select the
page you want to view.
3. When you’ve made your selection, press the
center of the ClickPoint.
You will jump to the selected page, and that
page will appear.
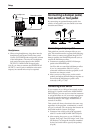
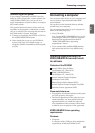
As an example here, try selecting “Key Zone.”
The 5: Ed–Key Zone page will appear.
Note: The page that appears will be the page of the
tab you selected most recently.
Note: If you set the Global mode setting “Page
Menu Style” to List, you can move by selecting
pages and tabs as shown in the following
illustration. (The display shown in step 2 is for
when “Page Menu Style” = Icon.)
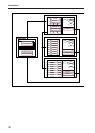
Using the [MENU/OK] button +
[PAGE+][PAGE–] buttons to move
• Hold down the [MENU/OK] button and press
the [PAGE+] ([PAGE–] button.
In Combination mode, you will move between
pages in the order of 0: Play ↔ 1: Ed–Tone Adjust
↔ 2: Ed–Track Parameter ↔ 3: Ed–MIDI Filter1 ↔
... etc. The page that appears will be the page of
the tab you selected most recently.
[EXIT/CANCEL] button
•You can press the [EXIT/CANCEL] button to
return to page 0 from any page.
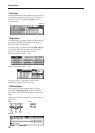
Selecting tabs
[PAGE+][PAGE–] buttons
You can press these buttons to move forward or
backward in steps of one tab.
1. Press the [PAGE+] button to access the page for
the next (right) tab. (Press [PAGE–] button to
access the page for the previous (left) tab.)
This example shows the Combination page
through Prog page of COMBI 0: Play.
2. As you repeatedly press the [PAGE+] button or
[PAGE–] button, you will move consecutively
through the tabs. As you page up past the last
tab of a page, you will then move to the first tab
of the next page. Likewise, as you page down
past the first tab of a page, you will then move
to the last tab of the preceding page.
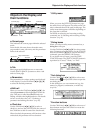
3. Selecting a parameter and editing
the value
1. Use the ClickPoint [√][®][π][†] to select the
parameter you want to edit.
The value will be highlighted, and the
parameter name is displayed in the upper right
of the display. (We call this the “edit cell.”)
2. To modify the value of the edit cell, use the
[VALUE] dial or the ClickPoint.
Note: You can use the [COMPARE] button to
compare the sound you’re editing with the
original unedited sound.
VALUE controllers
[VALUE] dial
Use this dial to edit the selected parameter’s value.
ClickPoint
After selecting a parameter expressed as a numeri-
cal value etc., press the center of the ClickPoint;
the value will be highlighted, and now you can
use [π][†] to increase or decrease the value. To
finalize the value, press the center once again.
If you press the [EXIT/CANCEL] button while
pressing the ClickPoint center, the selected value
will be reset to 0 or the minimum value.
In addition, you can press the ClickPoint center to
turn a check box or switch on/off.
[COMPARE] button
Use this when you wish to compare the edits you
have made to a program or combination’s sound
with the un-edited original (i.e., the sound that is
written into memory).
When editing a program or combination, press
this switch. The LED will light, and the last-writ-
ten settings for that program number or combina-
tion number will be recalled. When you press the
[COMPARE] button once again, the LED will go