


REALTIME CONTROLS [1], [2], [3], [4], [SELECT]
61
Quick StartIntroductionSetupProgram
Combination
Adjusting the volume
Here’s how to adjust the volume of each timbre.
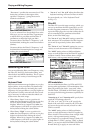
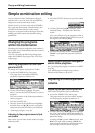
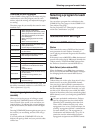
1. Access the COMBI 0: Play, Mixer page.
2. Use the ClickPoint [√][®][π][†] to highlight
the “Volume” of the timbre whose volume
setting you want to adjust, and use the
[VALUE] dial etc. to adjust the setting.
Adjusting the volume while preserving
the volume balance between timbres
1. Press the [UTILITY] button to access the utility
menu.
2. Use the ClickPoint [π][†] to select “Hold
Balance,” and press the ClickPoint center.
The upper right of the display will indicate
“Hold Bal.”
3. When you change the “Volume” value of any
timbre, the volume of all timbres will also
change to preserve the volume balance at the
time you checked the Hold Balance setting.
4. To defeat this setting, press “Hold Balance”
once again and press the ClickPoint center.
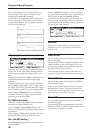
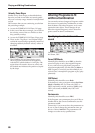
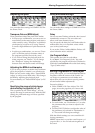
REALTIME CONTROLS [1], [2],
[3], [4], [SELECT]
Just as in Program mode, you can use the realtime
controller [1]–[4] knobs and [SELECT] button in
Combination mode to modify sounds and effects,
or to control the arpeggiator. See “REALTIME
CONTROLS [1], [2], [3], [4], [SELECT]” (☞p.43).
The REALTIME CONTROLS [1]–[4] knobs can
transmit MIDI messages (as specified by the exter-
nal control setup) to your external MIDI equip-
ment. If you turn the [EXT. CONTROLLER]
button on (lit), these knobs will be switched to the
external control function, and will be disconnected
from the internal sound generator. For more about
external control, see “External control settings”
(☞p.111).
Note: The REALTIME CONTROLS A-mode and B-
mode can control timbres of the same channel as
the global MIDI channel.
Saving your edits
Once you’ve tweaked the sound to perfection,
you’ll want to save your work. To save your edits:
1. Press the [UTILITY] button to access the utility
menu.
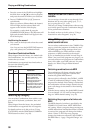
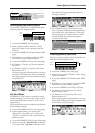
2. Use the ClickPoint to select “Write
Combination,” and then press the ClickPoint
center.
The Write Combination dialog box will appear.
Note: If the display indicates “Memory
Protected,” the combination memory protect is
turned on. Go to GLOBAL 0: System,
Preference page, and uncheck the Memory
Protect “Combination” setting. (☞p.88)
3. Optionally, you can also select a new location,
or change the Combination’s name.
• If you want to change the bank and number of
the writing destination, use the ClickPoint to
select the combination name located at the right
of the “To,” and use the [VALUE] dial to select
the desired writing destination.
• If you want to change the name, use the Click-
Point to select the text button ( ) and then
press the ClickPoint center to open the text edit
dialog box.
You can give the Combination a descriptive
name using the on-screen keyboard. (☞p.114)
After entering the name, press [MENU/OK]
button.
The text edit window will disappear, returning
you to the main Write dialog.
• If you want to specify the category, use the
ClickPoint to select “Category,” and use the
[VALUE] dial to specify the desired category.
The category you specify here can be used
when selecting by category with the
[CATEGORY] button. (☞p.58)
4. In the Write Combination dialog box, press the
[MENU/OK] button to write (save) the
program.
5. A message will ask you for confirmation. If you
are sure you want to write the program, press
the [MENU/OK] button once again.
The combination will be written (saved).