


2.4 Installation Overview
Installation Manual 41
2.4 Installation Overview
The following is an overview of the steps needed to install optional cards and prepare the VPS
hardware for use. Once hardware installation is complete, see Customising the System for
instructions on software setup and VPS customisation.
CAUTION
The information below is only intended as an overview of the installation process. When installing
the VPS, refer to the sections listed below for detailed instructions.
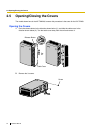
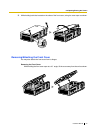
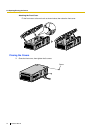
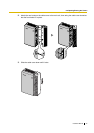
1. Open the covers (see 2.5 Opening/Closing the Covers).
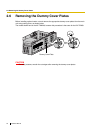
2. Remove the Dummy Cover Plates (see 2.6 Removing the Dummy Cover Plates).
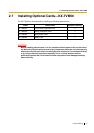
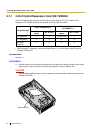
3. Install the optional cards (see 2.7 Installing Optional Cards—KX-TVM50 or 2.8 Installing Optional
Cards—KX-TVM200).
4. Connect the VPS to the appropriate extension ports of the PBX (see 1.2.2 Connection
Examples—KX-TVM50 or 1.2.3 Connection Examples—KX-TVM200). Use 4-conductor or 2-
conductor cable as necessary (see 2.9 PBX Connections).
5. Connect the VPS to the PC to be used for programming (see 2.10 PC Connection).
6. Connect the VPS to earth (see 2.11 Frame Earth Connection).
7. Connect the AC adaptor to the VPS and to the power outlet (see 2.12 Connecting the AC
Adaptor).
CAUTION
The power cord is the main disconnect device. Make sure that the power outlet is located near
the VPS and is easily accessible.
8. Secure the cables (see 2.13 Securing the Cables).
9. Initialise the VPS (see 2.14 Initialising the VPS During Installation).
10. Close the covers (see 2.5 Opening/Closing the Covers).
11. Wall mount the VPS and AC adaptor (see 2.15 Wall Mounting).
CAUTION
To turn off the power on the VPS, first press the Shutdown button, wait for the Alarm
Indicator to light, then turn off the power switch. Turning off the power switch before the
Alarm Indicator lights may cause the VPS to take an exceptionally long time (up to 10
minutes) to start up the next time the power is turned on.