


Model 8904A Instrument Changes
7-4.
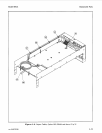
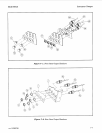
FRONT-TO-REAR-PANEL OUTPUT CONVERSION
Description
This procedure describes how to convert an instrument with front-panel output connectors (that is, a
standard instrument) to one with rear-panel connectors (that is, Option
004).
The procedure applies
to instruments with one pair of outputs
or
two
(that is, Option
002).
The modifications requires partial disassembly of the instrument (removing covers and routing of
cables).
No
soldering
is
required. Modification should be done in a static protected environment. After
modification,
two
performance tests must be run.
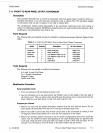
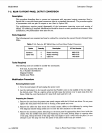
Parts Required
The following parts are required and may be ordered by contacting the nearest Hewlett-Packard Sales
Office.
Table
7-1.
Parts
for
HP
8904A
Rant-to-Rear-Panel
Output
Conversion
Option
I
Quantity
Standard
Option 002
Standard
Option
002
Description
Plastic
Hole-Plug
Plastic Hole-Plug
Lock Washer
0.505
inch
ID
Lock Washer
0.505
inch
ID
Cable
Tie
Label
Blank
HP Part Number
6960-01
32
6960-01
32
21
90-0068
21
90-0068
1400-0249
51
80-1 871
Tools Required
The following tools are needed to modify the instrument:
9/16 inch, 6 point Nut Driver
No.
2
Pozidriv Screwdriver
Diagonal Cutters
Needle-nose Pliers
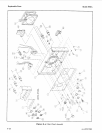
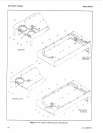
Modification Procedure
Removing
Bottom
Cover
1.
Turn the instrument
off
and unplug the power cord.
2.
Lay the instrument on its top and unscrew the Pozidriv screw in the middle of the rear edge of
the bottom cover. This
is
a captive screw and will cause the bottom cover to push away from the
frame. Slide the cover back about 6.5 mm
(0.25
inch) and lift
it
off.
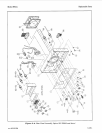
Preparing the Chassis
1.
Remove the nuts from the present front-panel outputs with the 9/16 inch nut driver. Do not
press against the front panel with the tool
or
scoring of the panel may occur.
2.
Remove the cable tie around the loop of slack coaxial cable in the instrument by cutting it with
the diagonal cutters being careful not to score the soft insulation on the cables.
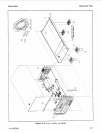
3.
Remove the necessary plastic hole-plugs in the rear panel by approaching them from inside the
chassis with the needle-nose pliers and squeezing-in the small holding tangs on opposite sides
of the plug. Grasp the front of the plug with your fingers
to
pull
it
away from the panel.
Do
not
attempt to pry the plug out from the panel
or
the panel surface may get scarred.
rev.15DEC89
Front-to-Rear-Panel Output Conversion
7-3