


Model 8904A Instrument Changes
Installing the Front
Panel
16. Remove any existing, unneeded hole plugs from the new front-panel assembly.
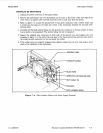
17. Install the line switch bracket supplied in the kit
(HP
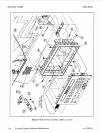
08904-00022, item 142 in figure 7-6, Detail
A
herein) on to the line switch using the two Pozidriv screws supplied in the kit
(HP
0515-2028,
items 143 and 144). Tighten the screws to 0.6 N.m
(5
in.lb).
18.
Install the line switch bracket on to the front frame using two of the screws (items 84 and 145
in figure 7-6) securing the old front panel to the frame (item 89). Do not tighten the screws at
this time.
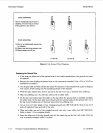
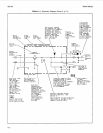
19. Connect the wide ribbon cable (AlW1 in figure
1)
from the new keyboard to the front of the
A2
Digital Assembly. Be careful not to bend any pins.
20. Place the new front panel into the frame and loosely secure the assembly
to
the frame on the top
and sides with the original screws. Check that the cables to the front panel and the line switch
keycap are positioned correctly before pushing the front panel completely into the frame.
21.
Tighten the screws in the frame in the following sequence: item 76,
80,
81,
75, 78, 77, then 79.
Tighten the screws to 1.3 N.m
(11
in.lb).
If
the top screws bind, remove the front panel and
try
repositioning the display shield installed in step 15.
22. Position the line switch in the frame and the hole in the front panel then tighten the securing
screws (items 84 and 145). Tighten the screws to
1.3
N.m
(11
in.lb).
23. Re-install the BNC connectors to the new front panel as applicable. Be sure the connectors
go
to the proper front-panel holes.
24.
Reconnect the
two
connectors from the A5 LCD Display to the A2 Digital Assembly.
Final Assembly and Testing
25. Re-install the top and side trim strips and the covers.
26. Check the general functioning of the instrument by performing the Basic Functional Checks in
the
Operation and Calibration Manual.
Also, check the functioning of all front-panel keys and
the line switch.
rev.15DEC89
Firmware Updates/Hardware Modifications
7-1
7