SMF FORMAT 0
This instrument’s SEQUENCER data can be
saved in the “Standard MIDI File” format (FOR-
MAT 0) for use on other instruments.
• What you can save in the SMF format (FOR-
MAT 0) is ordinary performance data, such as
note data. Data such as chord and rhythm
data, COMPOSER data, etc. is not saved. If
you wish to also save this special Technics
data, save the data in the Technics File format.
• If you use the APC TO SMF CONVERT func-
tion of the SEQUENCER, you can convert the
patterns of the automatic accompaniment, etc.
to SMF data. (Refer to page 104.)
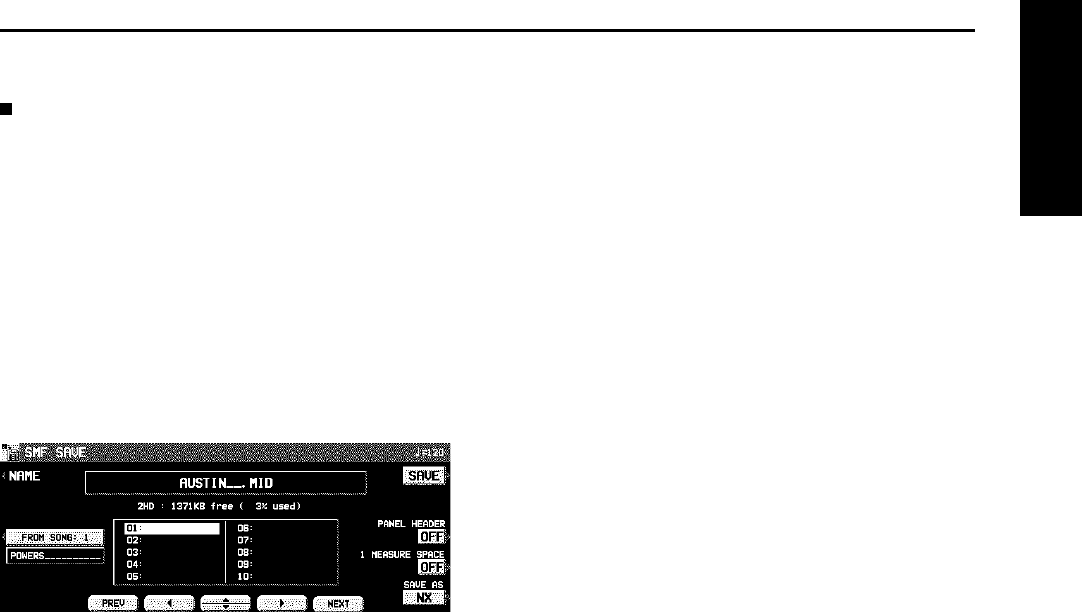
1. Use the buttons below the display to select
the song number you wish to save to.
• If the number of files is 10 or more, you can
use the PREV and NEXT buttons to go back
or advance 10 files at a time.
2. If you wish to assign a name to the file, press
the NAME button.
3. Use the buttons below the display to assign a
name.
4. Press the OK button.
• The display returns to the SAVE display.
5. Use the FROM SONG buttons to select the
SEQUENCER song number you wish to save.
• The song name to save from is shown below
the FROM SONG button.
6. Use the PANEL HEADER buttons to specify
ON or OFF.
ON:
The sound and volume settings for each
part are saved as data at the beginning of
the file.
OFF:
This data is not saved.
7. Use the 1 MEASURE SPACE buttons to select
ON or OFF.
ON:
A one-measure space is added to the begin-
ning of the file.
OFF:
No space is added.
• When there is various data other than perform-
ance data stored at the beginning of a file, the
start of playback may be delayed. This can be
avoided by set the 1 MEASURE SPACE to ON
to inserting a before the beginning of the per-
formance.
• When set to ON, a space is added each time
a file is saved. Therefore, if you have already
saved a file once with the 1 MEASURE SPACE
set to ON, please set it to OFF each time the
file is subsequently saved.
8. Use the SAVE AS button to select the sound
generator mode (GM/GM2/NX).
9. Press the SAVE button.
• The SAVE operation begins.
• When the operation has been successfully
completed, “COMPLETED!” is shown on the
display.
• If you attempt to save data to a file number in
which data is currently saved, the display
changes to the confirmation display. Press the
YES button to continue the SAVE procedure,
or press the NO button if you wish to cancel
it.
Disk Drive
Part VI Disk Drive
133
QQTG0671
