


109
Quick loop sampler
11
Using sample libraries
Sample libraries contain sets of up to sixteen different
samples that can be used by the Quick Loop Sampler.
When the AW16G is shipped from the factory, sets of
samples such as drum loops and sounds effects are
stored on the hard disk as sample libraries. When you
load one of these libraries, samples will be assigned to
each pad/sample bank, and you can use the pads to play
the samples immediately. Here’s how to load a sample
library and try it out.
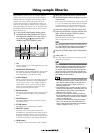
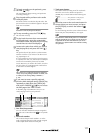
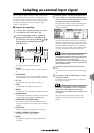
1
In the Quick Loop Sampler section, either
repeatedly press the [SAMPLE EDIT] key or
hold down the [SAMPLE EDIT] key and use
the CURSOR [ ]/[ ] keys to access the
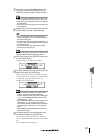
LIBRARY page of the SAMPLE screen.
1 List
This area displays a list of the sample libraries saved
on the hard disk.
B NAME/OLD/SIZE buttons
These buttons sort the sample libraries shown in the
list, either alphabetically (NAME), by when they
were saved (OLD), or by their size (SIZE).
C LISTEN button
When you move the cursor to this button and press
the [ENTER] key, the button will be highlighted. If
you now press a pad 1–4, the sample assigned to
sample bank A of the currently selected sample
library will play repeatedly. Playback will stop
when you press the pad once again.
D RECALL button
This button recalls the library that is selected in the
list, and assigns the samples to each pad/sample
bank.
E DELETE button
This button deletes the library selected in the list
from the hard disk.
F STORE button
This button stores a library that you edited.
G PROTECT button
Move the cursor to this button and press the
[ENTER] key to switch the Protect setting on/off for
the library selected in the list. A lock icon will be
displayed to indicate a library that is protected, and
it will not be possible to edit or delete this library.
H NEW button
This button creates a new library on the hard disk.
2
Move the cursor into the list, and turn the
[DATA/JOG] dial to select the library that you
want to load.
By turning on the LISTEN button and pressing a pad
1–4, you can audition the samples that are assigned
to sample bank A for each pad in that library. For
details on the library contents, refer to “Appendix.”
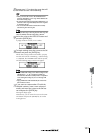
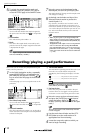
3
Move the cursor to the RECALL button and
press the [ENTER] key. A popup window will
open. Move the cursor to the ALL button,
and press the [ENTER] key.
When the library has been loaded, the popup win-
dow will automatically close.
Tip!
Tip!
When the popup window is open, you can move the cur-
sor to the 1SAMPLE button and press the [ENTER] key to
select and load just a single sample from the library.
4
Raise the [STEREO] fader to the 0 dB position.
5
Strike pads 1–4.
You can play the samples that are assigned to sam-
ple bank A of each pad.
Tip!
Tip!
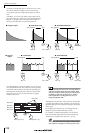
Of the sample libraries saved on the hard disk when the
AW16G is shipped, most drum pattern libraries that are
set to Loop mode have the Slice function turned on. If
you load this type of library, you only need to press the
pad, and the tempo of the drum pattern will match the
tempo of the song. This lets you use the Quick Loop Sam-
pler similarly to a drum machine.
Note
Note
• If a sample is assigned to a pad, that pad will light while
the sample plays when you press it. However if no sam-
ple is assigned, nothing will play and the pad will not
light. You can either assign a sample to the pad, or
switch the sample bank.
• If the pad lights when you strike a pad but you hear no
sound, access the METER page of the VIEW screen, and
check whether the meter of the corresponding pad
channel (P1–P4) is moving (
→
p. 90).
• If the meter moves when you strike a pad, make sure
that the [STEREO] fader has not been lowered, and that
your monitor system is connected correctly and that its
volume is set appropriately.
• If you hear no sound even after raising the [STEREO]
fader, access the INIT page of the MONITOR screen
and press that pad. This will initialize the pad channel
so that it will produce sound. (
→
p. 91)
7 8 65
43 12