Recording to a sound clip
36
■ Recording a sound clip
1
In the Locate section, press the [SOUND
CLIP] key.
The CLIP screen will appear, where you can record
and play sound clips.
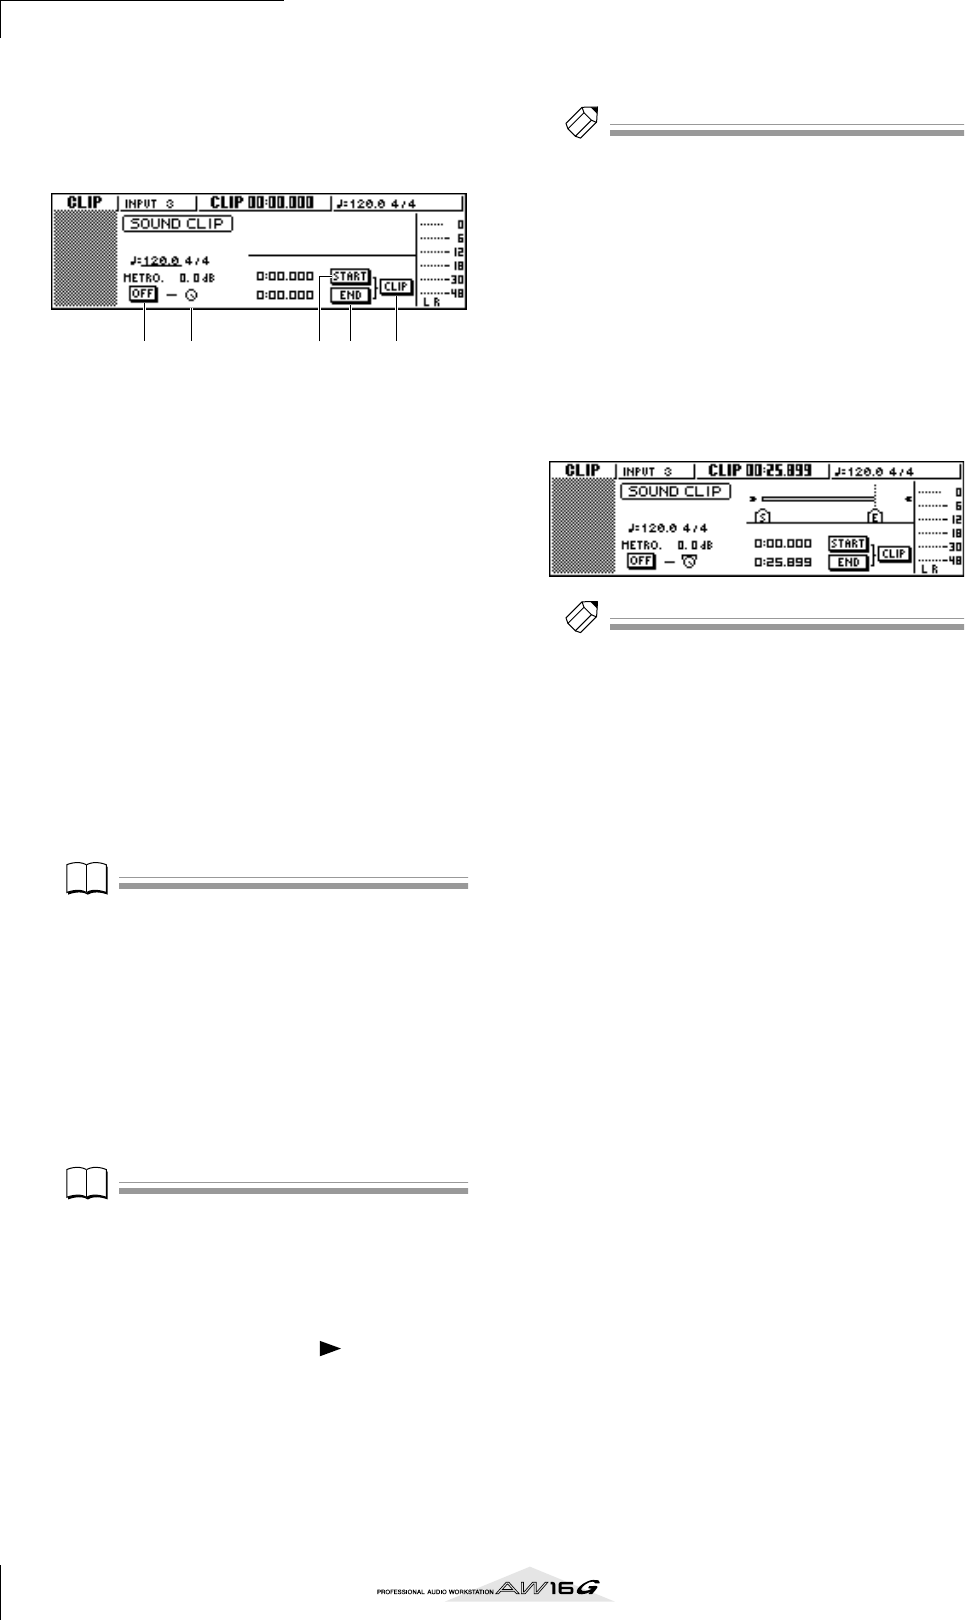
1 Metronome button
Switches the metronome on/off.
B Metronome knob
Adjusts the volume level of the metronome. The
value shown above the knob shows the current set-
ting in dB units.
C START button
Specifies the current location as the start point of
the sound clip (the location at which playback will
begin). The current location is shown in minutes/
seconds/milliseconds at the left.
D END button
Specifies the current location as the end point of the
sound clip (the location at which playback will
end). The current location is shown in minutes/sec-
onds/milliseconds at the left.
E CLIP button
When you turn this button on, the START button
(
3) and END button (4) settings will be enabled.
Note
Recording and playback in the Recorder section cannot
be performed while the CLIP screen is displayed.
2
If you want to use the metronome, move the
cursor to the metronome button and press
the [ENTER] key.
The time signature and tempo used by the metro-
nome are displayed above the metronome button.
3
To change the tempo of the metronome,
move the cursor to the tempo value and turn
the [DATA/JOG] dial.
Note
The time signature of the metronome is determined by
the tempo map setting immediately prior to accessing the
CLIP screen. Please be aware that the setting cannot be
edited from this screen. (For details on tempo map set-
tings
→
p. 142)
4
In the Transport section, hold down the REC
[●] key and press the PLAY [ ] key.
The metronome will begin sounding, and the
counter display will advance. The counter in the
CLIP screen always starts from 0, and indicates the
current time in minutes/seconds/milliseconds. This
counter is separate from the counter of a conven-
tional song.
5
Play your instrument in time with the metro-
nome.
Tip!
• The metronome sound will not be recorded in the
sound clip. If necessary, you can move the cursor to the
metronome knob and turn the [DATA/JOG] dial to
adjust the volume level of the metronome sound.
• In addition to an instrument connected to the MIC/
LINE INPUT jacks, your performance on the quick loop
sampler pads can also be recorded.
• The knobs/keys of the selected channel are active even
while the CLIP screen is displayed. If necessary, you can
record the signal processed by EQ and dynamics (
→
p. 50).
6
To stop recording, press the STOP [■] key.
The display will show S and E symbols to indicate
the start point and end point.
Tip!
•With the default settings of the AW16G, a maximum of
30 seconds can be recorded in a sound clip. If you con-
tinue recording for longer than 30 seconds, the last 30
seconds of your playing before you stopped recording
will be recorded. (However, the counter display during
recording will continue to advance.)
• In the UTILITY screen PREFER page, you can specify up
to 180 seconds as the maximum length that can be
recorded in a sound clip. You are free to make this set-
ting before creating a new song, but this cannot be
changed once the song has been created. (
→
p. 162)
1 42 3 5


