


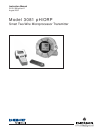

QUICK REFERENCE GUIDE
MODEL 3081PH/ORP
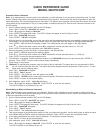
Automatic Buffer Calibration
Note: A pH measurement is only as good as the calibration, and the calibration is only as good as the buffers used. For best
results, calibrate with buffers having the same temperature as the process. Allow time for the sensor and buffers to reach the
same temperature. If the process temperature is more than 10°C different from the buffer, allow at least 20 minutes. Be careful
using buffers at high temperatures. The pH of many buffers is undefined above 60°C. See the main instruction manual for fur-
ther information.
A. Aim the infrared remote controller (IRC) at the LCD display.
Press HOLD on the IRC. HoLd OFF will appear.
Press Ð to toggle the display to HoLd On.
Press ENTER to engage hold mode. The HOLD indicator will appear to the left of the pH value.
B. Press CAL . CALIbrAtE will appear.
Press ENTER . CAL bF1 will appear.
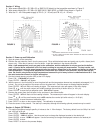
C. With the sensor in the first buffer, be sure the glass bulb and the temperature element are completely submerged (about 3
inches deep). Do not let the weight of the sensor rest on the glass bulb. Swirl the sensor to dislodge trapped bubbles.
Press ENTER . bF1 will flash until reading is stable. The measured pH value will appear in the main display.
Press
Ï
or
Ð
until the small number next to bF 1 matches the nominal pH buffer value (i.e., 4.01 pH).
Press ENTER to save the first calibration point. CAL bF2 will appear.
D. Remove the sensor from the first buffer, rinse and place in the second buffer.
Press ENTER . bF2 will flash until the reading is stable.
Press
Ï
or
Ð
until the small number next to bF 2 matches the nominal pH buffer value (i.e., 10.00 pH).
Press ENTER to save the second calibration point.
E. The calibration is complete, but the transmitter remains in the CALIbrAtE sub-menu for two minutes after ENTER is
pressed. Press RESET to return to the process display immediately.
F. Place sensor in the process.
G. (Optional) For maintenance purposes, track the slope of the pH electrode. The slope value of a new electrode is 59mV
per pH unit, and this value falls over time. The sensor should be changed when the slope nears 47.5mV per pH. To view
the slope value, use the following steps.
Press CAL . CALIbrAtE will appear.
Press NEXT . Std will appear.
Press ENTER . The current pH value will appear next to Std.
Press ENTER . SLOPE and the current slope value will appear. Record this number as the slope value.
Press RESET to return to the process display.
H. After calibration, press HOLD . HoLd On will display.
Press
Ð
to toggle the display to HoLd Off. Press ENTER to save this into memory.
The HOLD indicator on the display will turn off.
Standardizing to Match a Reference Instrument
Note: Standardization does not perform a true calibration. Regular buffer calibrations are still needed to update the sensor
slope value. For best results take the grab sample from a point as close as possible to the pH sensor and measure the sample
at the same temperature as the process.
A. Aim the infrared remote controller (IRC) at the LCD display.
Press HOLD on the IRC. HoLd OFF will appear.
Press
Ð
to toggle the display to HoLd On.
Press ENTER to engage the hold mode. The HOLD indicator will appear to the left of the pH value.
B. Press CAL . CALIbrAtE will appear.
Press NEXT . Std will appear.
Press ENTER . The measured value will appear.
C. Take a grab sample of the process and measure it with your reference instrument. Use the editing keys to adjust the value
on the Model 3081pH/ORP to match the reference instrument. Press ENTER to save the corrected pH value.
D. If the value is acceptable, the sensor slope is displayed. The slope has not been changed.
E. Press RESET to return to the process display.
F. After calibration, press HOLD . HoLd On will display.
Press
Ð
to toggle the display to HoLd Off. Press ENTER to save this into memory.
The HOLD indicator on the display will turn off.