


72
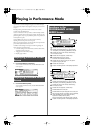
Creating a Performance
With the Fantom-Xa, you have total control over a wide variety of
settings. Each item that can be set is known as a
parameter
. When
you change the values of parameters, you are doing what is referred
to as
Editing
. This chapter explains the procedures used in creating
Performances, and the functions of the Performance parameters.
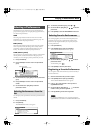
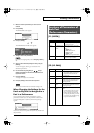
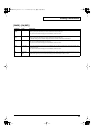
In Performance mode you can view the part settings as a list. This is
called the “PART VIEW” screen. In this screen you can view a list
that shows settings for five parts at once, such as the patch assigned
to each part, and its volume and pan settings. You can also edit these
settings here, and make detailed settings that cannot be made in the
PERFORM LAYER screen, or PERFORM MIXER screen.
1.
Access the PERFORM LAYER screen.
2.
Press [F2 (PARTVIEW)].
The PART VIEW screen will appear.
fig.PartView
3.
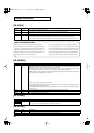
Press to select the part.
4.
Press [PAGE], [F1]–[F6], and/or
to select the
parameter.
The name of the parameter at the cursor location is displayed in
the top line of the PART VIEW screen.
fig.PartView2
5.
Use the VALUE dial or [INC] [DEC] to change the value.
6.
When you have finished editing, press [EXIT] to return to
the PERFORM LAYER screen.
If you return to the PERFORM LAYER screen without saving,
an “*” will be displayed at the left of the performance group.
If you turn off the power or select a different sound while the
display indicates “*,” your edited rhythm set will be lost.
“Initialize” means to return the settings of the currently selected
sound to a standard set of values.
* The Initialize operation will affect only the currently selected sound;
the sounds that are stored in user memory will not be affected. If you
wish to restore all of the Fantom-Xa’s settings to their factory values,
perform a Factory Reset (p. 203).
1.
Press [LAYER/SPLIT] to access the PERFORM LAYER
screen.
2.
Select the Performance that you want to initialize (p. 67).
3.
Hold down [SHIFT] and press [F6 (INIT)].
The Performance Initialize window appears.
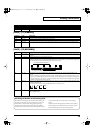
4.
Press to select the initialization type.
Default:
Resets the currently selected performance in
the Temporary memory to the standard
values. Use this setting when you wish to
create a sound from scratch.
Sound Control:
Initializes the values of the following part
parameters. Cutoff Offset, Resonance Offset,
Attack Time Offset, Release Time Offset,
Decay Time Offset, Vibrato Rate, Vibrato,
Depth, Vibrato Delay
5.
Press [F6 (SELECT)].
A message will ask you for confirmation.
6.
Press [F6 (EXEC)].
The initialization will be carried out.
* To cancel, press [F5 (CANCEL)].
When using patches in Performance mode, some settings such as
effects settings will be affected by Performance settings. If you wish
to edit a patch while hearing how it will sound in the Performance,
use this procedure:
* Here we explain how to change the setting of a patch assigned to a
part. The procedure for changing the settings of rhythm sets is the
same. Substitute “rhythm set” wherever “patch” appears in a
sentence.
1.
Make sure the Performance mode is selected.
2.
Press [PATCH EDIT].
The patch assigned to the part is displayed in the PATCH EDIT
screen.
3.
The rest of the procedure is the same as when making
changes in Patch mode (p. 35).
Changes you make to sound settings are temporary, and will be lost
if you turn off the power or select another sound. If you want to keep
the modified sound, you must save it in the internal USER group
(user memory) or CARD group (memory card).
When you edit the settings of a Performance, an “*” will appear in
the PERFORM LAYER screen.
When you perform the save procedure, the data that previously
occupied the save destination will be lost.
Adjusting the Parameters of
Each Part
Initializing Performance Settings
Changing the Settings of the
Patch Assigned to a Part
Saving a Performance
You’ve Created (Write)
Fantom-Xa_e.book 72 ページ 2004年10月22日 金曜日 午後2時3分