


AW2400 Owner’s Manual
The Trigger Track Function
Track operations and editing
134
15
The Trigger Track function can be used as described
below.
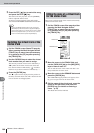
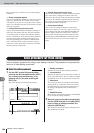
1
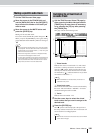
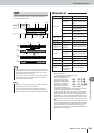
Call the TRACK screen Trigger page by
either pressing the Work Navigate section
[TRACK] key as many times as necessary,
or by pressing the [F4] key after pressing
the [TRACK] key.
This page contains the following items.
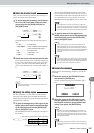
1 NORMAL button
For normal audio track operation this button should be
turned on (normal track mode).
B TRIGGER button
Turn this button on to engage the Trigger Track mode
(trigger track mode).
C GROUP
Move the cursor to this field and use the [DATA/JOG]
dial or [INC]/[DEC] keys to set the trigger track group
for each track. Groups can only be assigned when the
Trigger Track mode is engaged.
D FADER START button
When this button is on playback of the corresponding
track (or group including the track) will start when the
track fader is raised above the -∞ position. Playback
will stop at the end of the recorded data. Playback can
be stopped by returning the fader to the -∞ position.
This button can only be turned on or off when the
Trigger Track mode is engaged.
2
Move the cursor to the TRIGGER button and
press the [ENTER] key to engage the Trig-
ger Track mode.
A popup window asking you to confirm that you want
to exit from the normal track mode will appear. Move
the cursor to the OK button and press the [ENTER]
key.
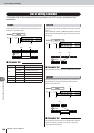
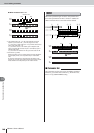
3
To set the group to which each track
belongs move the cursor to the GROUP
field and use the [DATA/JOG] dial or [INC]/
[DEC] keys.
The Trigger Track mode allows each track to be
assigned to one of four groups A–D so that playback
of entire groups of tracks can be started and stopped
by simply pressing one [ON] key or operating one
fader.
4
To engage the Fader Start function for a
track move the cursor to the FADER START
button and press the [ENTER] key.
When the Fader Start function is on, playback of the
corresponding track (or group including the track) will
start when the track fader is raised above the –
∞ posi-
tion. Playback can be stopped by returning the fader to
the –
∞ position.
• When the Trigger Track function is active the Transport,
Locate, and Locate/Navigate section keys (with the exception
of the STOP [
■
] key) will not function, and normal record/play-
back operations are not available.
NOTE
• The Trigger Track settings are saved individually with each
song.
• When a song is saved with the Trigger Track function active,
the Trigger Track function will still be active and a message
indicating that status will appear when that song is later
recalled.
HINT
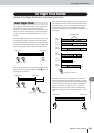
Using the Trigger Track Function
DC BA
• Since a maximum of 12 tracks can be played back for 24-bit
songs (
→
p. 165), mute cannot be disengaged for tracks 13–
24 and they will remain in the normal track mode.
NOTE
• “_” will be displayed for tracks that are not assigned to a
group, and those tracks will be triggered independently.
• Channel pairs to be used for linked stereo operation should
be assigned as paired channels beforehand (
→
p. 58).
HINT
• The Fader Start function can be turned off for all tracks by
pressing the [F1] key while holding the [SHIFT] key (“–” will be
displayed for all tracks).
• The Trigger Track group A–D settings can be copied to fader
groups (
→
p. 82) by pressing the [F2] key while holding the
[SHIFT] key. This can be useful for linking fader start opera-
tion of multiple trigger tracks.
HINT