


AW2400 Owner’s Manual
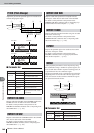
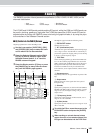
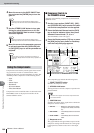
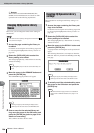
4-band EQ
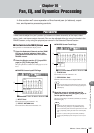
Pan, EQ, and Dynamics Processing
150
16
6
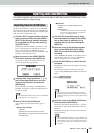
Move the cursor to the parameter that you
want to edit, and use the [DATA/JOG] dial or
the [INC]/[DEC] keys to adjust the value.
7
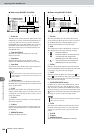
To switch the LOW band type, move the cur-
sor to the LOW band Q knob and continue
turning the [DATA/JOG] dial toward the left
or right.
If you continue turning the Q knob toward the right,
the Q knob value will indicate “L.SHELF,” and will
switch to the shelving type.
If you turn the Q knob toward the left, the Q knob
value field will change to a numerical value, and will
switch to the same boost/cut type as the HI-MID and
LO-MID bands.
If you continue turning the Q knob toward the left, the
Q knob value field will indicate “HPF,” and the LOW
band will function as a high-pass filter. If “HPF” is
selected, you can use the LOW band G knob to switch
the high-pass filter on/off.
8
To switch the HIGH band type, move the
cursor to the HIGH band Q knob and con-
tinue turning the [DATA/JOG] dial toward
the left or right.
If you continue turning the Q knob toward the right,
the Q knob value will indicate “H.SHELF,” and will
switch to the shelving type.
If you turn the Q knob toward the left, the Q knob
value field will change to a numerical value, and will
switch to the same boost/cut type as the HI-MID and
LO-MID bands.
If you continue turning the Q knob toward the left, the
Q knob value field will indicate “LPF,” and the HIGH
band will function as a low-pass filter. If “LPF” is
selected, you can use the HIGH band G knob to switch
the low-pass filter on/off.
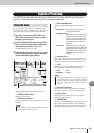
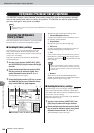
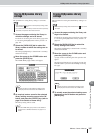
Using Selected Channel section knobs 2–4 to adjust EQ.
1
Use the Layer section, [INPUT SEL], [SEL],
and [STEREO SEL] keys to select the chan-
nel for which EQ is to be controlled.
2
Press the Selected Channel section [LOW],
[LO-MID], [HI-MID], or [HIGH] key, according
to the band you want to control.
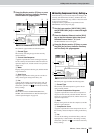
The selected key’s indicator will light, as will the
[PAN/EQ] key.
With the default settings the PAN/EQ screen will
appear automatically. The display will not change if
the UTILITY screen Preference page AUTO DIS-
PLAY button is set to OFF.
3
Rotate Selected Channel knobs 2–4.
The parameters for the channels selected in step 1 and
the band selected in step 2 will change accordingly.
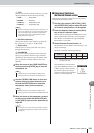
The knobs control the following parameters.
If the UTILITY screen Preference
page AUTO DISPLAY button is set
to OFF, a popup window showing
the current EQ settings will appear
while Selected Channel knobs 2–4
are being operated.
• If you press the [F1] (FLAT) key while holding the [SHIFT] key
from the PAN/EQ screen EQ/Att. page, all G knobs for the
currently selected channel will be set to 0.0dB (or OFF).
HINT
• EQ settings can also be recalled from the EQ library, or your
own settings can be saved for later recall. See “EQ/Dynamics
Processor Library Operation” on page 154 for details.
• If boost in a particular band results clipping on the meters,
use the ATT. knob to reduce the signal level.
• Selected Channel knobs 2, 3, and 4 also function while the
PAN/EQ screen EQ/Att. page is showing.
HINT
Selected Channel
knobs 2–4
2 3 4
Parameters Q
Frequency
(center
frequency)
Gain
■ EQ Control via the Selected
Channel section