


AW2400 Owner’s Manual
WAV File Transfer (USB Storage Mode)
234
USB
24
6
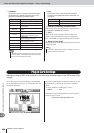
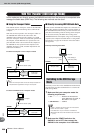
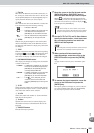
When you have finished setting the param-
eters, move the cursor to the EXECUTE but-
ton and press the [ENTER] key.
If a source other than “ALL” is selected the NAME
EDIT popup window will appear, allowing you to
enter a file name.
If you select “ALL” as the source the NAME EDIT
popup window will appear, allowing you to enter a
folder name. The WAV files (“TRACK_01.WAV”–
“TRACK_24.WAV”) will be stored in the new folder,
which will be created inside the “Transport” folder.
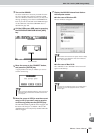
7
Enter an appropriate file or folder name via
the NAME EDIT popup window, as required.
For details on how to enter a name, refer to page 32.
8
To execute the export operation, move the
cursor to the OK button and press the
[ENTER] key.
The export operation will begin. If you move the cur-
sor to the CANCEL button (instead of the OK button)
and press the [ENTER] key, the export operation will
be cancelled. (However, it is not possible to abort the
export process once it has been started.)
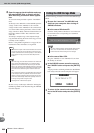
9
Switch to the USB Storage Mode (→ p. 230)
and display the AW2400 internal hard disk
on the computer screen.
10
Open the “AW2400-2” drive to access the
“Transport” folder.
11
Copy the WAV files exported to the “Trans-
port” folder to the computer.
WAV files in the “Transport” folder can also be
directly accessed from computer applications.
12
When the files have been copied, discon-
nect the AW2400 from the computer and
exit the USB Storage Mode (→ p. 232).
This procedure allows you to import WAV files transferred
from a computer to the “Transport” folder to be imported
into specified audio tracks.
1
Switch to the USB Storage Mode (→ p. 230)
and display the AW2400 internal hard disk
on the computer screen.
2
Copy the WAV files from the computer to
the AW2400 “Transport” folder.
The “Transport” folder is located in the “AW2400-2”
drive.
3
When the files have been copied, discon-
nect the AW2400 from the computer and
exit the USB Storage Mode (→ p. 232).
4
Call the EDIT screen Edit page by either
pressing the Work Navigate section [EDIT]
key as many times as necessary, or by
pressing the [F1] key after pressing the
[EDIT] key.
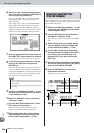
5
Move the cursor to the edit command field
and use the [DATA/JOG] dial or [INC]/[DEC]
keys to select IMPORT USB WAV.
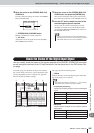
6
Press the [ENTER] key to confirm the
selected edit command.
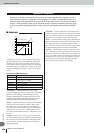
The display will appear as follows.
• Since the AW2400 does not keep track of the date and time,
dummy values will be written as the file creation date and time
of the WAV files.
•Tracks that do not contain data in the specified region will not
be exported.
NOTE
Importing Copied WAV Files
From the Computer
A
B
HGFI
DEC