


98
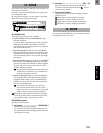
P1 AtPunch: Settings for auto
punch-in/out recording
Auto punch-in/out recording is a function that auto-
matically starts recording (punch-in) and stops record-
ing (punch-out) at the time locations you specify
beforehand.
If you record when “AutoPunch” is “On,” punch-in/
out recording will occur automatically.
By turning the [RHSL] key “On,” you can rehearse
auto punch-in/out recording (i.e., practice without
actually recording anything). (→p.112)
1. AutoPunch .................................................[On, Off]
Set the auto punch-in/out recording function on/
off.
On: When you record, auto
punch recording will occur. When “On,” the
[AUTO PUNCH] key will light.
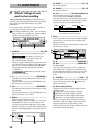
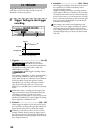
When you begin recording, the song will start at the
pre-roll time before the registered time (IN), record-
ing will occur for the recording region (IN–OUT),
and playback will stop after the post-roll time.
(→”RolTime”)
Off: When you record, record-
ing will occur normally.
2. In ....................................................(000:00.000…)
This shows the auto punch-in time (where record-
ing will begin).
To set this time location, use the [STORE] key and
[IN/LOC1] key, or use “Wave.”
3. Out..................................................(000:00.000…)
This shows the auto punch-out time (where record-
ing will end).
To set this time location, use the [STORE] key and
[OUT/LOC2] key, or use “Wave.”
4. RolTime ..................................................................
Specify the pre-roll and post-roll.
When using auto punch recording, you can specify
a pre-roll time so that you can be ready to start
recording at the punch-in (IN) point. Set the post-
roll time so that you can confirm the transition from
the end of recording (OUT) to the material that fol-
lows.
4a. PreRoll .................................................[00…10]
Set the pre-roll time.
4b. PostRoll................................................[00…10]
Set the post-roll time.
4c. Unit..............................[Second, Meas(Measure)]
Select the units for the pre/post roll times.
You can select either seconds or measures.
Press the “OK” button, and the specified pre/post-
roll times will take effect. If you press the “Cancel”
button, the times you set will be cancelled.
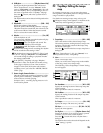
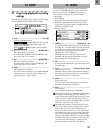
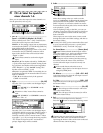
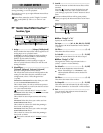
5. Wave......................................................................
You can view the waveform as you set IN and OUT,
which allows you to specify time locations with
greater precision.
The play-from/play-to and slow play functions can
also be used. (→p.101)
5a. In...............................................[000:00.000…]
5b. Out............................................[000:00.000…]
Set IN and OUT.
When you place the cursor at “In” or “Out,” the
track selected by “TrackSelect” will automatically
be set to Solo and Scrub On, so that you can rotate
the [VALUE] dial to hear only the sound of that
track.
5c. TrackSelect......................................[Track1…12]
Select the track whose waveform will be shown and
which will be played. Press the “ ” button and
select from the list.
5d. Zoom In/Out/Up/Down
Adjust the size of the waveform display and the
playback speed.
: Expand the waveform display vertically.
: Shrink the waveform display vertically.
: Expand the waveform display horizontally.
: Shrink the waveform display horizontally.
When you press the “OK” button, the times you
specified for “In” and “Out” will be overwritten
onto the respective keys ([IN/LOC1], [OUT/
LOC2]). If you press the “Cancel” button, the times
you selected will be cancelled.
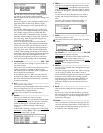
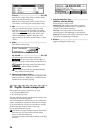
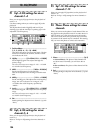
11. AUTO PUNCH
1 4
5
2 3
4
a
4c 4b
IN(LOC 1) OUT(LOC 2)
Stop recordingBegin recording
PreRoll
Auto punch-in/out recording
Loop recording (this region will be repeated)
PostRoll
Playback Playback
Recording
5a
5c
5d 5b