


82
2. SourceTrack .......... [1...12, 1–2...11–12, 1–4...9–12,
1–6, 7–12, 1–12, Clip#
*1
]
Select the copy source track.
*1
: “Clip#” can be selected only if the clipboard con-
tains data. # is the number of tracks in the clipboard.
You can use “Clip#” to copy data from the tracks of
another song. When data is copied between songs
of differing “Bit” (quantization) settings, the data
will be handled as 16 bit data at the copy destina-
tion.
In the case of a 24 bit song, only tracks 1–6 can be
selected.
3. DestTrack.............. [1...12, 1–2...11–12, 1–4...9–12,
1–6, 7–12, 1–12, Clip#
*1
]
Select the copy destination track.
*1
: The number of tracks in the clipboard is shown in
#. You can use “Clip#” to copy data to a track of
another song. When data is copied between songs
of differing “Bit” (quantization) settings, the data
will be handled as 16 bit data at the copy destina-
tion.
In the case of a 24 bit song, only tracks 1–6 can be
selected.
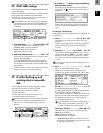
4. Times........................................................... [1...99]
Specify the number of times that the data will be
copied.
5. Exec. (Execute)........................................................
Execute the track editing operation.
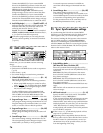
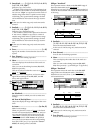
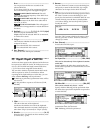
6. Wave .....................................................................
This area displays the audio data of the track as a
waveform.
Here you can set the editing locations (IN, OUT,
TO) more precisely.
This can be selected when the cursor is at “Sour
ce-
Track” or “DestTrack.”
Before you make settings here, it is best to make
approximate settings for the IN, OUT, and TO
times, and register them.
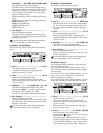
6a. SelectTrack........................................................
Select the track for which you wish to make time
settings.
6b. Zoom In/Out/Up/Down....................................
Adjust the displayed range and height of the wave-
form.
6c. Locate ..............................................[In, Out, To]
Make Locate settings.
When you place the cursor at “Locate
,” the Scrub
function will automatically be turned on, and you
can rotate the [VALUE] dial to listen to only the
“SelectT
rack” (solo) as you set the Locate points.
When you press the “OK” button, the specified
times will be overwritten onto the corresponding
keys ([IN/LOC1] etc.). If you press the “Cancel”
button, the setting will be cancelled.
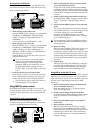
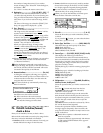
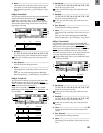
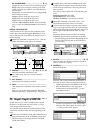
EditType: “InsertTrack”
This operation inserts a blank in the IN–OUT range of
the insert destination track (“DestT
rack”).
When this is executed (“Exec.”), any track data that fol-
lowed the inserted blank will be moved toward the end
of the song.
2. DestTrack ................................................................
[1...12, 1–2...11–12, 1–4...9–12, 1–6, 7–12, 1–12]
Select the insert destination track.
In the case of a 24 bit song, only tracks 1–6 can be
selected.
3. Exec. (Execute) ........................................................
Execute the track editing operation.
4. Wave......................................................................
This area displays the audio data of the track as a
waveform.
Here you can set the editing locations (IN, OUT,
TO) more precisely. (→p.81 EditType: “CopyTrack”)
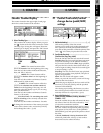
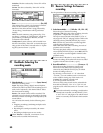
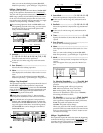
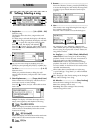
EditType: “EraseTrack”
This operation erases the track data in the IN–OUT
range of the erase destination track (“DestT
rack”).
When this is executed (“Exec.”), the IN–OUT range
will contain silence.
2. DestTrack ................................................................
[1...12, 1–2...11–12, 1–4...9–12, 1–6, 7–12, 1–12]
Select the erase destination track.
In the case of a 24 bit song, only tracks 1–6 can be
selected.
3. Exec. (Execute) ........................................................
Execute the track editing operation.
6c
6a
6b
1
3
4
2
IN
OUT
Blank
DestTrack
DestTrack
1
3
4
2
IN
OUT
Blank
DestTrack
DestTrack