


55
6 Verify that the data was exchanged correctly.
Press the [IN/LOC1] key to play back from the IN
location, and verify that the data was exchanged
correctly.
You can use Undo to return to the state before exe-
cuting the command. (→p.99)
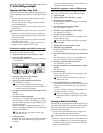
Expanding or compressing a track: Expan-
sion/Compression Track
This command expands or compresses the specified
region (IN–OUT) of recorded track data into the speci-
fied region (TO–END) of a specified track.
• The original data is left unchanged, and the time-
expanded/compressed result is created in another
track.
• You can select whether or not the pitch will be con-
verted.
• Not only a single track, but multiple adjacent tracks
of data can be converted simultaneously.
• The converted data can be copied multiple times in
succession.
This command can be used in ways such as the follow-
ing.
• Drum loops of different tempo can be changed to the
same tempo.
• Phrases can be made to fit into a specific time length.
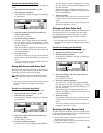
Procedure for expanding (Expansion) or compressing
(Compression) track data and copying it
Here’s how the IN–OUT range of track 1 can be con-
verted to the length of the TO–END range of track 2,
and copied there three times.
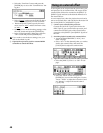
1 Register the IN, OUT, TO, and END times.
(→p.97)
2 Select the expansion/compression command.
In the [TRACK] “EditTrk” tab page, set “EditType”
to “Exp/CompTrack.”
3 Select the expansion/compression mode.
Select the “Mode” button and press the [ENTER]
key to access the dialog box.
For this example, select “Fast” and “Fixed.” Then
select the “OK” button and press the [ENTER] key
to return to the [TRACK] “EditTrk” tab page.
4 Select the expansion/compression source track
number.
Set “SourceTrack” to track 1.
5 Select the expansion/compression destination
track number.
Set “DestTrack” to track 2.
6 Specify the number of times that the data will be
copied.
Set “Times” to 3.
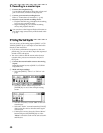
7 Execute the editing command.
Select the “Exec.” button and press the [ENTER]
key. The display will ask “AreYouSure?,” so select
the “Yes” button and press the [ENTER] key to exe-
cute the command.
When processing is completed, the display will
indicate “Completed.” Select the “OK” button and
press the [ENTER] key.
8 Verify that the data was processed correctly.
Press the [TO/LOC3] key to play back from the TO
location, and verify that the data was expanded/
compressed correctly.
You can use Undo to return to the state before exe-
cuting the command. (→p.99)
The longer the specified range (IN–OUT), the
longer this command will take to process until the
“Completed” display appears.
Copying an entire track/Copying to a
V-track: Copy Whole Track
This command copies an entire recorded track (from
beginning to end) to a different entire track.
• You can copy not only one track, but multiple tracks
simultaneously.
• The currently selected virtual track can be copied to
multiple other virtual tracks.
This command can be used in ways such as the follow-
ing.
• The same track can be copied to multiple virtual
tracks, and used to create multiple takes that are par-
tially different.
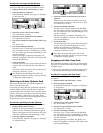
Procedure for copying an entire track
Here’s how track 1 can be copied to V-track “a” (=cur-
rently selected) of track 2.
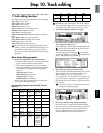
1 Select the Copy Whole command.
In the [TRACK] “EditTrk” tab page, set “EditType”
to “CopyWholeTrack.”
2 Select the copy source track number.
Set “SourceTrack” to track 1.
3 Select the copy destination track number.
Set “DestTrack” to track 2.
4 Select the copy destination V-track.
Set “DestVTrack” to V-track “a.”
5 Execute the editing command.
Select the “Exec.” button and press the [ENTER]
key. The display will ask “AreYouSure?,” so select
the “Yes” button and press the [ENTER] key to exe-
cute the command.
When processing is completed, the display will
indicate “Completed.” Select the “OK” button and
press the [ENTER] key.
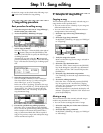
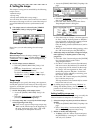
DestTrack TimesSourceTrack
DestTrack DestVTrackSourceTrack
Basic operation
Track editing