


31
Trigger recording
This is a function that uses the input level (trigger) to
initiate recording. Recording will begin at the instant
that sound is input to the D12.
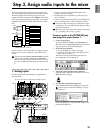
1 Connect the input device, and set the recording
level.
Refer to “1. Analog inputs” and “1. Adjust the
recording level, and record” (→p.23, 27).
2 Select trigger recording.
Access the [TRIGGER] “Trigger” tab page, and turn
“TriggerRec” On (the [TRIGGER] key will light).
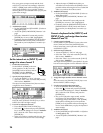
3 Press the [REC] key to enter record-ready mode
(LED blinking).
4 Begin playing.
When the input level exceeds the threshold level
(“Threshold”), recording will begin automatically.
Refer to “Thr
eshold” and “PreTrigTime.” (→p.100)
You can use the Rehearsal function to check the
threshold level.
5 When you have finished playing, press the
[STOP] key to stop.
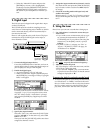
Loop recording
When using auto-punch recording, you can use Loop
recording to record repeated takes over the same sec-
tion, and then use undo/redo to choose the best take.
If you turn “Loop” “On” during auto-punch recording,
the IN–OUT region will be recorded repeatedly
(looped).
At this time, playback will occur before and after the
IN–OUT region for the lengths specified by the [AUTO
PUNCH] “AtPunch” tab page settings for “RolTime”
(“Pr
eRoll” and “PostRoll”).
1 Register the region (IN–OUT) that you wish to
record. (→p.35)
This setting can also be made using “Wave” in the
[LOOP] “Loop” or [AUTO PUNCH] “AtPunch”
tab pages.
2 Connect the input device, and adjust the record-
ing level.
Refer to “1. Analog inputs” and “1. Adjust the
recording level, and record” (→p.23, 27).
3 Specify how the sound will be output for moni-
toring.
Refer to “Manual punch-in/out” 2. (→p.28)
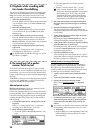
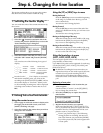
4 Set the pre-roll and post-roll.
• In the [AUTO PUNCH] “AtPunch” tab page,
select “RolTime.”
• Set “Pr
eRoll” to specify the length of playback
prior to the beginning of recording, and set
“PostRoll
” to specify the length of playback
after the end of recording. Set “Unit
” to select
the units in which the pre/post-roll times are
set.
• When you have made these settings, select the
“OK” button and press the [ENTER] key.
5 In the [AUTO PUNCH] “AtPunch” tab page, turn
“Auto Punch” “On.” (The [AUTO PUNCH] key
will light.)
6 In the [LOOP] “Loop” tab page, turn “Loop”
“On.”
7 Begin recording.
• When you press the [REC] key, the D12 will
locate to the beginning of the pre-roll time pre-
ceding the IN (recording start) point, and will
enter record-ready mode. (The [REC] key LED
will blink.)
• Press the [PLAY] key to begin playback.
Playback will occur for the pre-roll time, and
recording will begin at the IN time. (The [REC]
key LED will light.)
When the OUT time is reached, recording will
end, and playback will continue for the post-roll
time. (The [REC] key LED will blink.)
Then the D12 will locate to the beginning of the
pre-roll time, and the same operations will be
repeated.
• To stop, press the [STOP] key at a point outside
of the recording area (IN–OUT).
8 Listen to the recorded content.
Use the undo/redo function to select the best take.
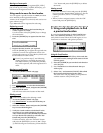
9 Press the [UNDO] key.
A list will show the latest and previous recordings.
0 Rotate the [VALUE] dial to select what you
believe to be the best take from the list.
A Press the “Undo” button to execute the Undo.
The selected take will be recalled.
B Play back, and verify that you selected the correct
take.
If the [AutoPunch] “AtPunch” tab page
“AutoPunch” setting is “On” when you press the
[PLAY] key, the region between the recording start
(IN) and recording end (OUT) points will play
back as a loop.
C If you decide to cancel the Undo, select the
“Redo” button and press the [ENTER] key to
return to the “Level00” take.
The undo operation you executed in step A will be
cancelled.
Select the “OK” button and press the [ENTER] key
to return to the previous screen.
Other recording methods
Basic operation
Recording