


109
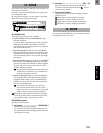
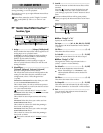
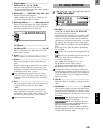
1. OutputLevelMeter ....................................................
(OUTL, R/CLP, –6, –12, –18, –40 dB)
This shows the output level of the effect.
The horizontal axis shows the effect output, and the
vertical axis shows the level.
2. EffectNumber ..........[F000, F001…032, u033…064]
Select the desired effect program.
“u033”–“u064” is the user area, in which you can
store effect programs that you edited.
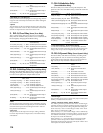
3. EffectProgramName................... (Effect Program List)
When you press this button, the “Effect Algorithm”
dialog box will appear. Here you can view the struc-
ture of the program and its on/off status.
3a. EffectIcon...........................................................
3b. Effect On/Off ...................................... [On, Off]
Refer to “EffectIcon” and “Effect On/Off” for the
insert effects (→p.106).
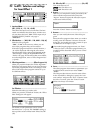
4. Bypass ....................................................................
Refer to “Bypass” for the insert effects (→p.106).
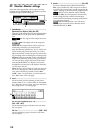
5. Rename...................................................................
Here you can modify the name of the effect pro-
gram.
Select the effect program whose name you wish to
modify, press the “Rename” button to access the
dialog box, and modify the name. A name of up to
16 characters can be input. (→p.21)
After modifying the program name, use “Store”
(→P6-6) to store it. The effect program name you
modified will be discarded unless you use “Store”
to store it.
6. Store.......................................................................
The effect program whose name or parameters you
modified can be stored in user areas “u033”–
”u064.”
The D12 provides 32 user areas for final effects.
In the “StoreEffect” dialog box, specify the “user
area number” and press the “Exec.” button to store
the effect. To cancel, press the “Cancel” button.
Effects are always overwritten.
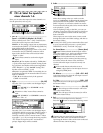
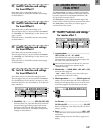
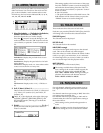
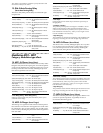
P1 Solo: Solo select
1. SelectSolo...............................................................
[1...6, 7–8...11–12, S1, S2, A1, R1, R2/On, Off]
Switch the solo function on/off.
Only the audio for which the “Solo” button is “On”
will be sent to the monitor bus. Use this function
when you wish to hear only a specific channel (or
channels) out of multiple audio sources, or to check
the send etc. The solo signal will be output to the
[MONITOR OUT L/R] jacks and to the [PHONES]
jack.
If one or more are “On,” the [SOLO/MONITOR]
key will blink.
On: Solo is on. Only the selected signal(s) will be
heard.
Off: Solo is off. If another signal is set to solo on,
signals for which solo is off will be muted.
1…6: Mixer channels 1–6
7–8…11–12: Mixer channels 7–8 – 11–12
S1, S2: Sends to master effects 1 and 2
A1: Send to external output [AUX OUT] jack
R1, R2: Return from master effect 1 and 2
To adjust the volume of each signal, use the corre-
sponding pages or knobs. Be aware that when you
switch the signal that is selected, some settings may
cause the monitor volume to change dramatically.
Please use caution.
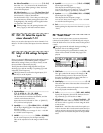
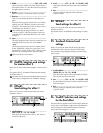
2. ClearAll ..................................................................
This turns “Off” all “SoloSelect” settings that were
“On.”
3. SoloToMstOut............................................. [On, Off]
This specifies whether or not the solo signal will be
output from the [MASTER OUT L/R] jacks. Use this
setting if you have connected your monitor system
to the [MASTER OUT L/R] jacks and wish to use it
for soloing.
On: The solo signal will be output
from the [MASTER OUT L/R] jacks.
Off: Normal operation. The solo
signal will be output from the [MONITOR OUT L/
R] jacks and from the [PHONES] jack.
The “On” setting is valid only within the [SOLO/
MONITOR] page. When you exit this page, it will
automatically be turned “Off.”
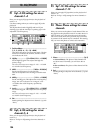
3b
3a
21. SOLO/MONITOR
1
2
3
Refer
e
SOLO MAST EFF