


29
Auto punch-in/out
Auto punch-in/out is when punch-in and punch-out
occur automatically at pre-specified times.
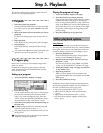
1 Access the [AUTO PUNCH] “AtPunch” tab page.
2 Register IN (punch-in) as the time at which
recording will begin, and OUT (punch-out) as the
time at which recording will end.
For details on registering the IN and OUT times,
refer to p.35.
In the [AUTO PUNCH] “AtPunch” tab page, you
can select the “Wave” button and press the
[ENTER] key to register the IN and OUT points
while viewing a waveform display.
The time locations you register will be overwritten
onto the [IN/LOC1] key and [OUT/LOC2] key.
3 Connect the input device, and adjust the record-
ing level.
Refer to “1. Analog inputs” and “1. Adjust the
recording level, and record” (→p.23, 27).
4 Make monitor output settings.
Refer to “Manual punch-in/out” step 2. (→p.28)
5 Specify the “pre-roll” – the length of playback
that will occur before the recording start location.
In the [AUTO PUNCH] “AtPunch” tab page, select
the “RolTime” button and press the [ENTER] key
to access the “SetRollTime” dialog box. (→p.98)
• Set “Pr
eRoll” to the desired length of playback
before the beginning of recording. Set “Pos-
tRoll” to the desired length of playback after the
end of recording. Set “Unit
” to the desired unit
of pre/post-roll time.
• When you have finished making settings, select
the “OK” button and press the [ENTER] key to
return to the previous page.
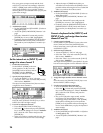
6 Turn on the auto punch-in/out function.
In the [AUTO PUNCH] “AtPunch” tab page, select
the “AutoPunch” button and press the [ENTER]
key to turn it “On.” The [AUTO PUNCH] key will
light.
7 Begin recording.
• When you press the [REC] key, the location will
move back from the specified record start time
by the length of the pre-roll time specified by
“Pr
eRoll,” and the D12 will enter record-ready
mode (LED blinking).
• When you press the [PLAY] key, playback will
begin. The track will play back during the pre-
roll time, and will switch to recording at the
specified point (IN). (The [REC] LED will light.)
• When the specified end of recording is reached,
recording will end. (The [REC] LED will blink.)
8 Press the [STOP] key to stop.
After the post-roll time has elapsed, the D12 will
stop and return to the beginning of the pre-roll
time.
9 Listen to the performance that you recorded.
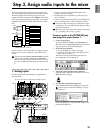
5. Combining multiple tracks into
two: Bounce
You can combine the performances of multiple tracks
into two tracks, thus freeing up the original tracks for
additional recording. This procedure is called bounc-
ing. You can use this when you wish to play back the
performances of more than 12 tracks simultaneously.
You can use bounce recording to do the following
things.
• Combine 12 tracks of audio, and overwrite-record
them onto two tracks.
• Combine 12 tracks of audio, and record them onto
two unused virtual tracks.
• Record 10 tracks of audio and two external input sig-
nals onto the remaining two tracks.
When you use a CD-R/RW drive to create an audio
CD, the data of tracks 1 and 2 will be written to the
CD, so you must combine your completed song
into tracks 1 and 2.
You can also mix down your completed song to
two tracks of the D12, instead of mixing down to
an external two-channel recorder.
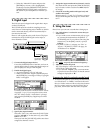
Combining 12 tracks of audio and over-
writing them onto 2 tracks
As an example, here’s how to combine the audio of
tracks 1–12, and overwrite-record the result onto tracks
1 and 2.
1 Select bounce recording as the recording mode.
• Access the [RECORD] “RecMode” tab page.
• Select “Bounce” (bounce recording).
2 Select the bounce mode.
• Access the [RECORD] “Bounce” tab page.
• Set “BounceMode” to “12Tr→2Tr.”
3 Choose the currently selected tracks for record-
ing.
Set “RecordVirtualTrack” to “Current.”
4 Select the tracks that you wish to record.
Set the status of the tracks to be recorded (tracks 1
and 2) to REC (LED lit red). Set the remaining
tracks (3–12) to PLAY (LED lit green).
5 Adjust the stereo positions of the playback tracks.
Press the [PLAY] key, and rotate the [PAN] and
[BALANCE] knobs to adjust the stereo positions of
channels 1–12.
6 Adjust the playback/recording levels.
Use the [CHANNEL] faders to adjust the playback
level.
• Press the [METER/TRACK VIEW] key.
• Select the “ ” button, and press the [ENTER]
key to access the dialog box. Select “PostFader-
Lev” so that you can view the meter display for
each fader.
7 Use the [MASTER] fader to adjust the recording
level.
When you are finished making adjustments, press
the [STOP] key.
8 Move the current location to the beginning of the
song. (→p.35)
Basic operation
Recording