


60
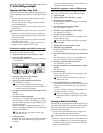
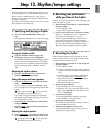
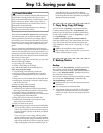
3 Verify the song to be moved.
Make sure that the move source song is selected in
“SourceSong.”
4 Select the move destination song number.
Use “DestSong” to select the move destination
song number.
5 Execute the editing operation.
Select the “Exec.” button and press the [ENTER]
key. In response to the “AreYouSure?” display,
select the “Yes” button and press the [ENTER] key
to execute the operation.
When the operation is completed, the display will
indicate “Completed.” Select the “OK” button and
press the [ENTER] key.
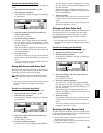
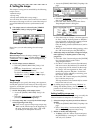
Deleting a song
This command deletes the selected song.
1 Select the song that you wish to delete (“Dest-
Song”). (→p.22)
2 Select the Delete Song command.
In the [SONG] “EditSong” tab page, set “EditType”
to “DeleteSong.”
3 Verify the song to be deleted.
Make sure that the song that you wish to delete is
selected in “DestSong.”
4 Execute the editing operation.
Select the “Exec.” button and press the [ENTER]
key. In response to the “AreYouSure?” display,
select the “Yes” button and press the [ENTER] key
to execute the operation.
When the operation is completed, the display will
indicate “Completed.” Select the “OK” button and
press the [ENTER] key.
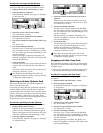
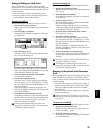
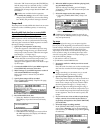
Protecting a song
This command protects the currently selected song so
that it cannot be written or deleted.
If the protect setting is turned on for a song, an error
message will appear if you attempt to record that song.
It will not be possible to modify any of the parameters
of that song.
• Use this command to avoid accidentally modifying a
completed song.
1 Select the song that you wish to protect (“Dest-
Song”). (→p.22)
2 Select the Protect Song command.
In the [SONG] “EditSong” tab page, set “EditType”
to “ProtectSong.”
3 Make sure that the song that you wish to protect
is selected in “DestSong.”
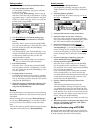
4 Turn protect on/off.
Select the “Exec.” button and press the [ENTER]
key. The protect “On” setting is indicated by a lock
icon. To turn the setting on/off, select the “Exec.”
button and press the [ENTER] key.
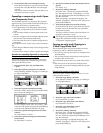
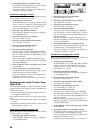
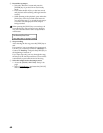
Copying all songs in a drive
This command copies all songs of the drive that con-
tains the currently selected song.
1 Select the copy source drive. (→p.22)
2 Select the Copy All Songs command.
In the [SONG] “EditSong” tab page, set “EditType”
to “CopyAllSongs.”
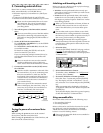
3 Verify the copy source drive.
Make sure that the copy source drive number is
selected in “SourceDrive.”
4 Select the copy destination drive.
Select the “Drive” button, press the [ENTER] key,
and select the copy destination drive in the dialog
box. Then select the “OK” button and press the
[ENTER] key.
5 Execute the editing operation.
Select the “Exec.” button and press the [ENTER]
key. In response to the “AreYouSure?” display,
select the “Yes” button and press the [ENTER] key
to execute the operation.
When the operation is completed, the display will
indicate “Completed.” Select the “OK” button and
press the [ENTER] key.
DestSongSourceSong
DestSong
DestSong
DestDriveSourceDrive