


111
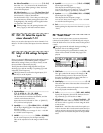
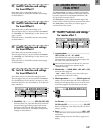
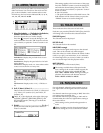
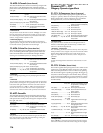
Here you can view the pre fader level meter and post
fader level meter. You can also use the track view dis-
play to check whether a track contains audio events.
From the top, the level meters indicate CLP, –3, –6, –9,
–12, –15, –18, –24 and –40 dB.
1. Select DisplayMode.........[PreFaderLev, PostFaderLev,
TrkView1–6, TrkView7–12, TrkView1–12]
Select the signals that you wish to display.
Press the “ ” button to access the dialog box, and
make a selection. Press the “OK” button to activate
your selection, or press the “Cancel” button to can-
cel.
PreFaderLev: Display the pre-fader level of each
mixer channel.
PostFaderLev: Display the post-fader level of each
mixer channel.
TrkView1–6: Display tracks 1–6. Areas where audio
events exist are shown as a heavy line.
TrkView7–12: Display tracks 7–12. (→“TrkView1–
6”)
TrkView1–12: Display tracks 1–12. (→“TrkView1–
6”)
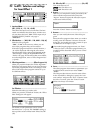
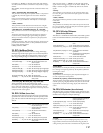
2. Snd1, 2/Mon L, R/Mst L, R.......................................
These are the level meters for “Snd1, 2” (effect send
1, 2), “Mon L, R” (monitor L, R), and “Mst L, R”
(master L, R).
“MstL, R” is also displayed at the right of the page
in [SONG], [TRACK], [RECORD], [INPUT], and
[EQ/PHASE] modes, allowing you to check the
master LR level.
3. PkHold.................................................... [0…8s, ∞]
Specify the time until the peak hold of the level
meter is cancelled.
This setting applies to the level meters of this page.
Press the “PkHold” button to access the dialog box,
and make the desired setting. Press the “OK” but-
ton to activate your selection, or press the “Cancel”
button to cancel.
0…8s: 0–8 seconds
∞: The peak hold indicator will be held forever. The
hold indicator will be cleared when you press the
“PkHold” button to access the dialog box.
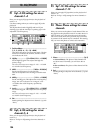
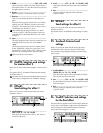
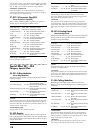
These indicators show the status of each track.
Each time you press the [TRACK STATUS] key, the LED
will change color to indicate the selected function.
PLAY (LED lit green)
The selected track can be played.
REC (LED lit red)
The selected track can be recorded.
INPUT (LED lit orange)
An external audio signal can be input to the selected
track. This can be selected only while stopped.
Select this when you wish to listen to the sound of other
tracks as you play your instrument, or as a substitute
for rehearsing before you record, or when you wish to
mix an external input with the playback tracks.
MUTE (LED dark)
The selected track will be muted (silent).
The settings available here will depend on the
state/settings of the recorder. When stopped, the
selection will change in the order PLAY→IN-
PUT→REC→MUTE→PLAY. During recording or
playback, the selection will alternate between
PLAY↔MUTE or INPUT↔MUTE.
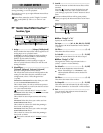
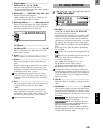
For each channel, adjust the stereo position (pan) or
left/right balance of the signal sent to the masterLR
bus.
For channels 1–6 whose pair setting is “Off,” this is the
pan setting to the masterLR bus.
For channels 1–6 whose pair setting is “On” and for
channels 7–12, this is the left/right balance setting to
the master LR bus.
These settings can be paired and registered in a
scene.
When recording to tracks whose channels have a
balance setting, be sure to set the knob at “CNT.”
22. METER/TRACK VIEW
1
3
2
23. TRACK STATUS
24. PAN/BALANCE
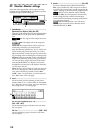
Refer
e
SOLOMETERPAN STATUSFADERTRANSPORT