


14
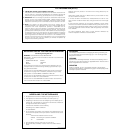
MOTIF The Controls & Connectors
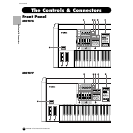
Front Panel
The Control & Connectors
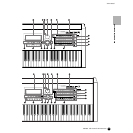
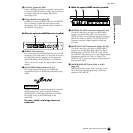
) SEQ TRANSPORT buttons
(page 78, 179, 183, 217, 221)
These buttons control recording and playback of the
Song/Pattern sequence data.
[](Top) button
Instantly returns to the first beginning of the
current song or pattern (i.e., the first beat of the first
measure).
[](Reverse) button
Press briefly to move back one measure at a time, or
hold to continuously rewind.
[](Forward) button
Press briefly to move forward one measure at a time,
or hold to continuously fast-forward.
[REC] (Record) button
Press this to enable recording (Song or pattern
phrase). (The indicator lights.)
[](Stop) button
Press to stop recording or playback.
[](Play) button
Press to start playback from the current point in the
song or pattern. During recording and playback, the
indicator flashes at the current tempo.
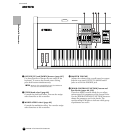
! MODE buttons (page 67)
These buttons select the MOTIF operating modes
(e.g., Voice mode).
@ LCD Display
The MOTIF’s large backlit LCD displays the
parameters and values related to the currently
selected operation or mode.
# LCD Contrast Control
Use this control to set the LCD display for optimum
legibility.
$ [F1] - [F6] (Function) buttons (page 71)
These buttons located directly below the LCD
display call up the corresponding functions
indicated in the display. In the display hierarchy,
these functions [F] rank just below the modes.
% [SF1] - [SF5] (Sub Function) buttons (page 71)
These buttons located directly below the LCD
display call up the corresponding sub functions
indicated in the display. In the display hierarchy,
these sub functions [SF] rank just below the
functions [F].
These buttons can be also used to store/recall the
Song Scene (page 115) in the Song Play/Song
Record/Pattern Chain Record modes.
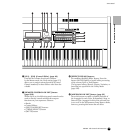
^ [INFORMATION] button (page 73)
For calling up a special “help” feature that shows
information about the currently selected mode. You
can go back to the previous display by pressing this
button again or pressing any other button.
& Data dial (page 72)
For editing (changing the value of) the currently
selected parameter. To increase the value, turn the
dial right (clockwise); to decrease the value, turn the
dial left (counter-clockwise). If a parameter with a
wide value range is selected, you can change the value
in broader strokes by quickly turning the dial.
* [INC/YES] button (page 72)
For increasing the value of the currently selected
parameter. Also use it to actually execute a Job or a
Store operation.
( [DEC/NO] button (page 72)
For decreasing the value of the currently selected
parameter. Also use it to cancel a Job or a Store
operation.
n When editing (changing) the value of the
parameter, it is convenient to use the [INC/YES]
button and the [DEC/NO] button simultaneously.
Pressing the [DEC/NO] button while holding the
[INC/YES] button increases the value by 10.
Pressing the [INC/YES] button while holding the
[DEC/NO] button decreases the value by 10.
º Cursor Buttons (page 72)
The cursor buttons move the “cursor” around the
LCD display screen, highlighting and selecting the
various parameters.
¡ [EXIT] button (page 72)
The menus and displays of the MOTIF are
organized according to a hierarchical structure.
Press this button to exit from the current display
and return to the previous level in the hierarchy.