


288
MOTIF Appendix
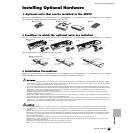
Installing Optional Hardware
Appendix
• Yamaha recommends that you purchase SIMMs that
conform to the JEDEC* standard. Please be aware,
however, that conformance to this standard does not
constitute a guarantee that the SIMMs will operate
correctly on the MOTIF.
• JEDEC (Joint Electron Device Engineering Council) sets
standards for terminal configurations within electronic
devices.
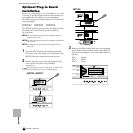
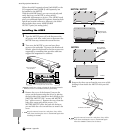
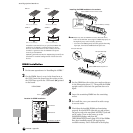
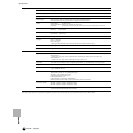
SIMM Installation
1 Use the same operation as in “Installing the AIEB2.”
2 On the SIMM, there is a cut in the board next to
the 1PIN. Insert the board into the socket so that
the 1PIN lines up with the 1PIN mark (▲) printed
on the board.
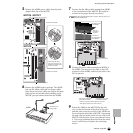
n Make sure that the SIMM is securely inserted in the
socket of the MOTIF. Inserting the SIMM improperly or
incompletely may result in faulty operation.
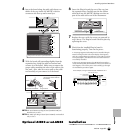
* To remove the SIMM, gently but firmly pull the fastening
clips open, then tilt the SIMM back and pull it out.
3 Set the SIMM into the socket at an angle as shown
in the illustration above (1). Then push the SIMM
upright until it clicks into the position shown in
figure
4 Insert the remaining SIMM into the remaining
socket.
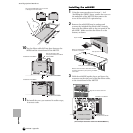
5 Re-install the cover you removed in earlier steps,
in reverse order.
6 Check that the installed SIMMs are functioning
properly. Set the MOTIF right-side up, and connect
the power cord to the rear-panel AC INLET jack and
an AC outlet. Turn on the power, go to the
SAMPLING display, and press the
[INFORMATION] button (page 276). If the SIMMs
have been installed properly, the appropriate
available memory size is indicated in the display.
4MB X 2
Internal memory
4MB
12MB can be used for sampling.
8MB X 2
Internal memory
4MB
20MB can be used for sampling.
16MB X 2
Internal memory
4MB
36MB can be used for sampling.
32MB X 2
Internal memory
4MB
64MB can be used for sampling.
Cutout
72PIN SIMM
to
PNA
to
JK
CN25CN24
114
to
PS
CN234
SIMM sockets
1PIN mark
Rear panel of the MOTIF
Underside of the MOTIF
Location for SIMM Installation
Tilt the SIMM and insert it into the socket.
Push the SIMM up vertically.
Cutout
Installing the SIMM modules to the sockets
Pull open these clips.
Pull open these clips.
Tilt the SIMM module and pull it out.