


96
MOTIF Quick Start Guide
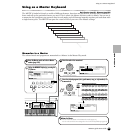
Using as a Master Keyboard
Quick Start Guide
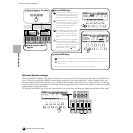
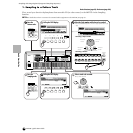
● Control Number settings
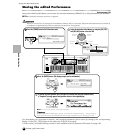
Here in the KN/CS display of the Master Edit mode, you can set how the Control knobs and sliders will affect each
Zone. This lets you specify a MIDI Control Change number for each knob and slider. In the example below, the
Control knobs for all Zones have been set to 10 (Pan), and the sliders have been set to 11 (Expression). In this way,
you can control the stereo position of each Zone with the appropriate knob, and use the sliders to adjust the relative
volume balance among the Zones.
This setting is available only when the Zone Switch is set to on from the Memory display in the Master Play mode.
PLG 2
A
B
C
D
E
F
G
H
15
CATEGORY
SEARCH
MODE
VOICE PERFORMMASTER
SEQUENCER
SONG
PATTERN
FILE
INTEGRATED
SAMPLING
MIXING
UTILITY
EDIT
JOB
STORE
COMPARE
SCENE STORE
SET LOCATE
SONG SCENE
SF 1 SF 2 SF 3 SF 4 SF 5
F1 F2 F3 F4 F6F5
INFORMATION
DEC/NO INC/YES
EXIT
ENTER
EXECUTE
MUSIC
PRODUCTION
SYNTHESIZER
Integrated
Sampling
Sequencer
Real-timeExternal Control
Surface
Modular
Synthesis Plug-in
System
DRUM KITS
FAVORITES
SLOT 1 SLOT 2 SLOT 3
PRE 1
PRE 2
PRE 3
GM
USER PLG 1
PLG 3
A. PIANO
KEYBOARD
ORGAN
GUITAR/
PLUCKED
BASS
STRINGS
BRASS
REED/PIPE
SYN LEADSYN PAD/
CHOIR
SYN COMPCHROMATIC
PERCUSSION
DRUM/
PERCUSSION
SE
MUSICAL FX COMBI
1
2
3
4
5
6
7
8
9
10
11
12
13
14
16
SECTION
TRACK
SELECT
MUTE
SOLO
BANK
GROUP
NUMBER
COMMON
ELEMENT/PERF.PART/ZONE
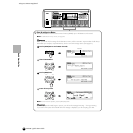
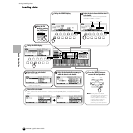
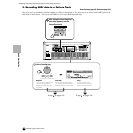
7
Store the settings to a Master
(page 94).
6
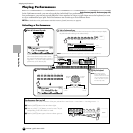
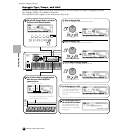
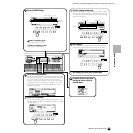
Call up the NOTE display.
Each Zone will sound the assigned voice within the note range set above.
1
2
Set the Note Limit H (High) of Zone 1 to B2. Set the Note Limit L (Low) of Zone 1 to C-2.
Set the Note Limit H (High) of Zone 2 and 3 to G8. Set the Note Limit L (Low) of Zone 2
and 3 to C3.
SF 1 SF 2 SF 3 SF 4 SF 5
F1 F2 F3 F6F5
4
Call up the display for Zone editing.
Press any of the buttons.
1
2
3
4
5
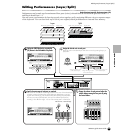
Call up the TRANS display.
1
3
4
2
Set the TG Switch of Zone 1 to on and
set those for all other Zones to off. This is
for transmitting the data played only in
the Zone 1 to the built-in tone generator.
Set the MIDI Switch of the Zone 2 and 3
to on and set the ones of the other Zones
to off. This is for transmitting the data
played in the Zone 2 and 3 to the
external tone generator.
Set the MIDI transmit channel of Zone 1
to 1. Set the MIDI transmit channel of
Zone 2 and 3 to match the Receive
channel of the external tone generator
(slave).
Make sure the external tone generator is
set to multi-timbral operation (different
voices for each of the 16 MIDI channels),
and select the appropriate voices on the
tone generator, corresponding to the
MIDI channels you set in above.
SF 1 SF 2 SF 3 SF 4 SF 5
F1 F2 F3 F6F5
3
SF 1SF 2SF 3SF 4SF 5
F1 F2 F3 F4 F6F5
AT TACK RELEASECUTOFF
RESONANCE
ASSIGN A ASSIGN B ASSIGN 1 ASSIGN 2
KN 1 KN 2 KN 3 KN 4
MEQ LOW
MEQ HI MIDMEQLOWMID MEQ HIGH