


M7CL Owner’s Manual
Other functions
20
229
Chapter 20
Other functions
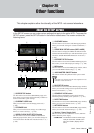
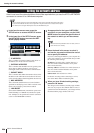
This chapter explains other functionality of the M7CL not covered elsewhere.
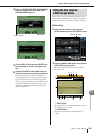
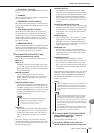
In the SETUP screen you can make various settings that apply to the entire M7CL. To access the
SETUP screen, press the SETUP button in the function access area. The screen contains the
following items.
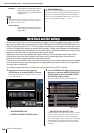
1
USER SETUP button
Use this button to access the USER SETUP popup win-
dow, where you can restrict the functionality available to
each user and make system settings.
B
CURRENT USER field
Here you can switch users and change passwords (
→
p. 209).
C
STORAGE field
Here you can save/load user settings on a USB storage
device, or create a user key (
→
p. 218).
D
WORD CLOCK/SLOT SETUP button
Use this button to access the WORD CLOCK/SLOT
SETUP popup window, where you can make settings for
word clock and for the I/O cards installed in slots 1–3 (
→
p. 230).
E
CASCADE button
Use this button to access the CASCADE popup window,
where you can make settings for cascade connections (
→
p. 232).
F
STAGE BOX SETUP button (M7CL-48ES)
Use this button to display the VIRTUAL RACK window
with the EXT-ES HA field open. This field enables you to
switch the STAGE BOX SETUP function on and off (
→
p. 242).
G
OUTPORT SETUP button
Use this button to access the OUTPUT PORT popup win-
dow, where you can make output port settings (
→
p. 106).
H
MIDI button
Use this button to access the MIDI popup window, where
you can make MIDI-related settings (
→
p. 198).
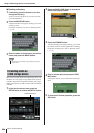
I
+48V MASTER ON/OFF button
This button switches the phantom master power on/off.
J
BUS SETUP button
Use this button to access the BUS SETUP popup window,
where you can make settings for bus operation and switch
between mono/stereo (
→
p. 234).
K
CONSOLE LOCK button
Use this button to enable the Console Lock function,
which temporarily disables panel operations (
→
p. 217).
L
DATE/TIME button
Use this button to access the DATE/TIME popup window,
where you can set the internal clock (
→
p. 235).
M
NETWORK button
Use this button to access the NETWORK popup window,
where you can make network settings (
→
p. 236).
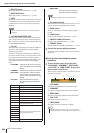
N
Version / Power Supply field
This area shows the current firmware version, and infor-
mation about the power supply.
• CPUM/CPUP
.. The firmware version is shown sepa-
rately for each CPU; “CPUM” (main
CPU) and “CPUP” (display control
CPU).
About the SETUP screen
2 3
K L
1
4
9
6 5 7 8
J
M N O
M7CL-48ES
• If this button is off, phantom power will not be supplied even if the
+48V button of each channel is on.
NOTE