


M7CL Owner’s Manual
Connecting SB168-ES units to the M7CL-48ES using the Stage Box Setup function
242
When you connect one M7CL-48ES to up to three SB168-ES units, using the Stage Box Setup
function enables you to set up the EtherSound patches and word clock without using AVS-
ESMonitor.
For more information on setting up patches, refer to “Connecting SB168-ES units to the M7CL-
48ES using the STAGE BOX SETUP function” (→ p. 43).
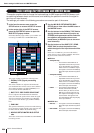
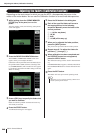
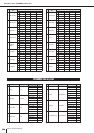
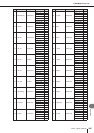
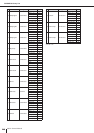
You can use the Stage Box Setup function in the EXT-ES HA field in the VIRTUAL RACK window.
Use one of the following two methods to display the EXT-ES HA field:
•Press the SETUP button, then press the STAGE BOX SETUP button in the SETUP screen.
•Press the RACK button, press the EXT-ES HA tab in the VIRTUAL RACK window, then press
the SB168-ES button in the VIEW field.
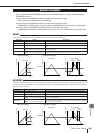
1 AUTO CONFIGURE button
This button switches the automatic configuration of Ether-
Sound patches on and off. When this button is switched
on, the master clock will be set to INT 48kHz (in a daisy
chain connection) or to EtherSound (48kHz) (in a ring
connection).
If you want to change the EtherSound setting in AVS-
ESMonitor or if you want the M7CL-48ES or SB168-ES
to start up with the settings made in AVS-ESMonitor,
switch this button off.
B DAISY CHAIN / RING buttons
Use these buttons to switch to DAISY CHAIN (daisy
chain connection) or RING (ring connection) setup,
according to the connection with the SB168-ES.
For more information on daisy chain and ring connec-
tions, please refer to “Connecting SB168-ES units to the
M7CL-48ES using the STAGE BOX SETUP function” (→
p. 43).
You can connect the M7CL-48ES and SB168-ES units in
a daisy chain or ring connection. If the connection type
and the Stage Box Setup data do not match, the patch and
word clock settings will not work properly.
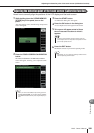
1
Press the AUTO CONFIGURE button to turn
it off (the button indicator will turn off).
2
Press the DAISY CHAIN button for a daisy
chain connection. Press the RING button
for a ring connection.
3
Press the AUTO CONFIGURE button to turn
it on (the button indicator will light).
A setup confirmation dialog box is displayed.
4
Confirm that the setting is correct, then
press the OK button.
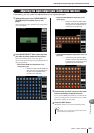
Connecting SB168-ES units to the M7CL-48ES
using the Stage Box Setup function
1 2
• The word clock setting cannot be changed if the AUTO CONFIG-
URE button is turned ON.
NOTE
Changing settings to suit the
connection
• Also, be sure to change the SB168-ES dip switches according to
the connection type. (
→
p. 43)
NOTE