


Setup items required when you start up the M7CL for the first time
51
M7CL Owner’s Manual
Connections and setup
4
In either case, you must use the following procedure to
specify the word clock source that the M7CL will use.
1
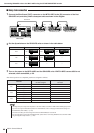
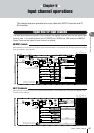
In the function access area, press the
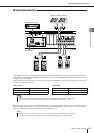
SETUP button to access the SETUP screen.
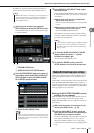
In the SETUP screen you can make settings that apply
to the entire M7CL.
1 SYSTEM SETUP field
B WORD CLOCK/SLOT SETUP button
2
In the SYSTEM SETUP field at the center of
the window, press the WORD CLOCK/SLOT
SETUP button to open the WORD CLOCK/
SLOT SETUP popup window.
1 WORD CLOCK SELECT field
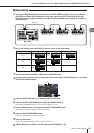
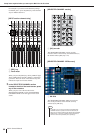
3
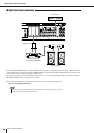
In the WORD CLOCK SELECT field, select
the clock source.
In the WORD CLOCK SELECT field, use the buttons
to select the clock source you want to use as the word
clock master.
● When using clock data from a digital audio
signal as the clock source
Press a valid two-channel button for the correspond-
ing slot.
● When using word clock data from the WORD
CLOCK IN jack as the clock source
Press the WORD CLOCK IN button.
If the M7CL is operating correctly with the selected
clock, the symbol immediately above the correspond-
ing button will turn light blue.
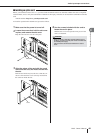
4
To close the WORD CLOCK/SLOT SETUP
popup window, press the “×” symbol
located in the upper right.
You will return to the SETUP screen.
5
To close the SETUP screen, press the
SETUP button in the function access area.
Here’s how to adjust the gain of the HA (Head Amp) for
each input channel to which a mic or instrument is con-
nected.
On the M7CL, channel parameters can be controlled using
either the SELECTED CHANNEL section to make set-
tings for a single channel, or using the Centralogic section
to make settings for up to eight channels. Use the method
that’s appropriate for your situation.
● Using the SELECTED CHANNEL section
(settings for one channel)
With this method, you select the input channel whose set-
tings you want to adjust, and use the encoders of the
SELECTED CHANNEL section to adjust the settings for
that channel.
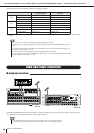
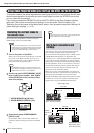
1
Make sure that a mic or instrument is con-
nected to an INPUT jack (→ p. 46).
2
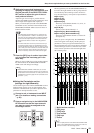
In the top panel INPUT section, press the
[SEL] key for the channel corresponding to
the INPUT jack you want to control.
In the state immediately after scene 000 is recalled, the
input signals from INPUT jacks 1–32 {1–48} are
being sent to INPUT channels 1–32 {1–48} respec-
tively, and can be controlled by corresponding channel
strip.
• The procedure below is not necessary if you are using the M7CL
as the word clock master, if no external devices are digitally con-
nected to the M7CL, or if the Auto Configure function on the
M7CL-48ES is turned on.
HINT
1 2
1
• When you switch the word clock source, noise may occur due
to loss of synchronization. Be sure to lower the volume of your
power amps and monitor system before you continue with the
following procedure.
NOTE
• The clock data of the digital audio signal supplied via a digital
I/O card in slots 1–3 can be selected in two-channel units.
•For details on word clock, refer to “Word Clock and Slot set-
tings” (
→
p. 230).
HINT
Making HA (Head Amp) gain settings