


M7CL Owner’s Manual
Setup items required when you start up the M7CL for the first time
50
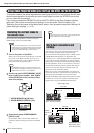
This section explains the setup required when starting up the M7CL for the first time. We will also
discuss basic operations for sending an input channel signal out from the STEREO bus so that
you can check the connections.
If you have connected the SB168-ES units to the M7CL-48ES via the Auto Configure function,
setup item “Word clock connections and settings” is now complete. Follow the steps in the
“Restoring the current scene to the default state” section, then proceed to setup item “Making HA
(Head Amp) gain settings” (
→
p. 51).
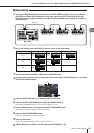
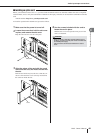
Turn on the power of the M7CL, and recall (load) the
default setting scene (scene number 000).
1
Turn on the power of the M7CL.
When you turn on the power of the M7CL, you should
first power-on the M7CL, and then power-on your
power amp and monitor system. (When turning the
power off, follow the opposite order.)
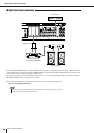
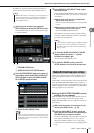
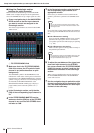
2
Use the top panel SCENE MEMORY [
▲
]/[
▼
]
keys to make scene number “000” appear
in the SCENE field in the function access
area of the display.
1
SCENE MEMORY [▲]/[▼] keys
B SCENE MEMORY [RECALL] key
3
Press the top panel SCENE MEMORY
[RECALL] key.
Scene number “000” will be loaded, and the mix
parameters and bus settings will return to the default
state.
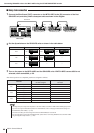
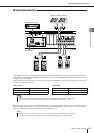
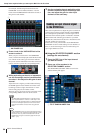
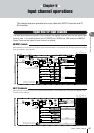
“Word clock” refers to the clock data that provides the
basis of timing for digital audio signal processing.
If you connect external equipment such as a DAW system
or HDR (Hard Disk Recorder) to a digital I/O card
installed in slot 1–3, this equipment must be synchronized
to the same word clock as the M7CL in order for digital
audio signals to be transferred between the M7CL and the
external equipment. To do so, set one device as the word
clock master (transmitting device), and the other devices
as the slaves (receiving devices) so that the slaves will
synchronize to the word clock master.
There are two ways in which the M7CL can operate as a
word clock slave that is synchronized to an externally-sup-
plied word clock; the M7CL can use the clock data
included in the digital audio signal being input from a dig-
ital I/O card, or it can use a separate word clock signal
supplied to the rear panel WORD CLOCK IN jack.
Setup items required when you start up the M7CL for the first time
Restoring the current scene to
the default state
• In the procedure described here, you are asked to recall this
default setting scene so that the remaining step in this chapter
can be performed appropriately. In actual operation, there is
no need to recall the default setting scene each time.
NOTE
• If a PW800W power supply is connected to the M7CL, the
power will turn on regardless of whether you first turn on the
POWER switch of the M7CL or of the PW800W.
HINT
1
2
SCENE field
• Be aware that when scene number “000” is loaded, the input
patch, output patch, internal effect, and HA (Head Amp) set-
tings will also return to their default state.
HINT
Word clock connections and
settings
Digital audio signal
+
Clock data
SLOT 1–3
HDR or other digital audio
device (word clock master)
M7CL (word clock slave)
Clock data
SLOT 1–3
Digital MTR or other
digital audio device
(word clock master)
M7CL (word clock slave)
Digital audio signal
WORD
CLOCK IN
jack