


Making HA (Head Amp) settings
M7CL Owner’s Manual
Input channel operations
5
61
This section explains how to make HA (Head Amp) related settings (phantom power on/off, gain,
phase) for each input channel.
1
If you only want to adjust the HA gain, you
can do so by using the HA encoder of the
SELECTED CHANNEL section. (p. 19)
2
If you want to edit detailed parameters such
as phantom power on/off or phase, use the
navigation keys to access the OVERVIEW
screen that includes the input channel
whose HA you want to edit.
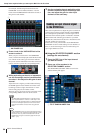
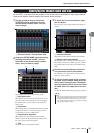
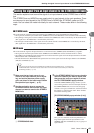
1
HA/PHASE field
3
Press the HA/PHASE field of the channel
whose HA you want to adjust; the HA/
PATCH popup window will appear.
This popup window can be viewed in three types of
view (1 ch, 8 ch, ALL), and you can use the tabs at the
bottom of the screen to switch between these types.
These windows include the following items.
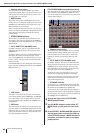
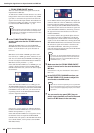
[HA/PATCH popup window (1 ch)]
Here you can make HA-related settings for the cur-
rently selected channel.
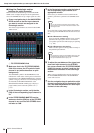
1
Icon / Channel number / Channel name
This shows the icon, channel number, and channel
name for that channel.
B
+48V button
This switches the phantom power on (red) or off
(black) for the head amp assigned to this channel.
C
GAIN knob
This indicates the gain of the head amp assigned to
this channel. To adjust this value, operate multifunc-
tion encoder 3. The level meter located at the immedi-
ate right of the knob indicates the input level for the
corresponding port.
D
ø (Phase) button
This switches the head amp assigned to the channel
between normal phase (black) and reverse phase
(orange).
E
INPUT PORT popup button
This shows the input port assigned to this channel. You
can press this button to access the INPUT PORT
SELECT popup window, where you can select the
input port for each channel.
F
Icon / Channel Name button
This shows the number, icon, and channel name for
that channel. You can press this button to access the
PATCH / NAME popup window, where you can edit
the input port patching and specify the channel name.
Making HA (Head Amp) settings
1
2 43 5 6
1
• If you’ve turned off the phantom power master setting in the
SETUP screen SYSTEM SETUP field, phantom power will
not be supplied even if the +48V button is turned on for each
channel.
NOTE
• If you don’t need phantom power, be sure to turn this button
off.
• Before you turn phantom power on, make sure that no
devices other than phantom-powered devices, such as a con-
denser microphone, are connected. Otherwise, you risk dam-
aging the devices.
• Do not connect or disconnect a device while phantom power
is applied. Doing so can damage the connected device and/or
the unit itself.
•To protect your speaker system, leave the power amps (pow-
ered speakers) turned off when switching the phantom power
on/off. We also recommend that you set all output level faders
to the minimum position. Otherwise, high-volume output may
damage your hearing or equipment.
CAUTION