


Connecting SB168-ES units to the M7CL-48ES using the STAGE BOX SETUP function
45
M7CL Owner’s Manual
Connections and setup
4
1
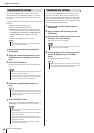
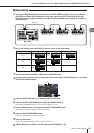
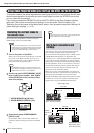
Connect the EtherSound [OUT] connector on the M7CL-48ES to the [IN] connector of the first
SB168-ES unit, daisy chain subsequent units, then connect the [OUT] connector of the last
SB168-ES unit to the [IN] connector on the M7CL-48ES as shown in the diagram to complete a
ring connection.
2
Set the dip switches on the SB168-ES units as shown in the table below.
3
Turn on the power to the M7CL-48ES and the SB168-ES units.
4
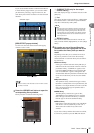
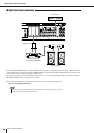
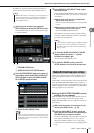
In the function access area on the right part of the screen, press the RACK button (
1
) to access
the VIRTUAL RACK window.
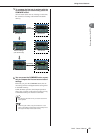
5
Press the EXT-ES HA tab (
2
) to display the EXT-ES HA field.
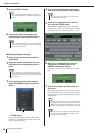
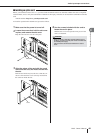
6
Press the AUTO CONFIGURE button below the EXT-ES HA field.
The AUTO CONFIGURE button is set to off and its indicator turns off.
7
Press the RING button to the right of the AUTO CONFIGURE button.
The connection setting is configured for a ring connection.
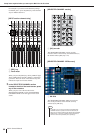
8
Press the AUTO CONFIGURE button.
A dialog box confirming the change is displayed.
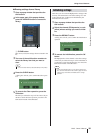
9
Press the OK button.
The AUTO CONFIGURE button and its indicator will turn on.
10
If M7CL-48ES’s scene #000 is not selected, recall scene #000. p. 138
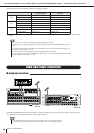
Number of SB168-ES units
ID #1 ID #2 ID #3
Three 1&5 2&5 3&6
Two 1&5 2&6
—
One 1&6
——
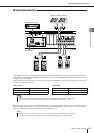
■ Ring connection
OUT IN OUT IN OUT
SB168-ES (ID #1) SB168-ES (ID #2) SB168-ES (ID #3)
M7CL-48ES
IN IN OUT
EtherSound
2
1