


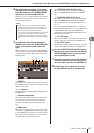
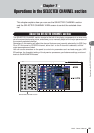

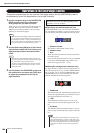

Operations in the SELECTED CHANNEL section
M7CL Owner’s Manual
Operations in the SELECTED CHANNEL section
7
95
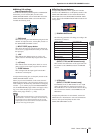
B OVER indicator
This will light when the post-EQ signal reaches the
overload point.
C EQ ON/OFF button
Switches the EQ on/off.
To edit the EQ, switch the EQ ON/OFF button on, and use
the EQ [Q], EQ [FREQUENCY], and EQ [GAIN] knobs
of the SELECTED CHANNEL section to adjust the cue,
center frequency, and the amount of boost/cut.
If you want to edit more detailed parameters, or recall
existing settings from the library, press any EQ or HPF
knob or a location within the EQ graph field to access the
EQ popup window. (For details on the popup window →
p. 115).
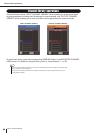
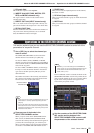
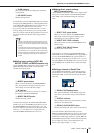
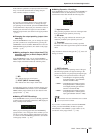
● Making insert settings
(INPUT, MIX,
MATRIX, STEREO, and MONO channels only)
Use the INSERT field to make insert-related settings in the
SELECTED CHANNEL VIEW screen. This field
includes the following items.
1 INSERT popup button
When you press this button, the INSERT/DIRECT
OUT popup window will appear, allowing you to
make settings for insert and direct output.
B IN indicator
This indicates the presence or absence of a signal at
the input port patched to INSERT IN.
C INSERT ON/OFF button
Switches the insert on/off.
To make insert settings in the SELECTED CHANNEL
VIEW screen, press the INSERT popup button to access
the INSERT/DIRECT OUT popup window (1 ch), and
assign an output port and input port to the insert-out and
insert-in (→ p. 112). When you’ve assigned the ports,
press the INSERT ON/OFF button to turn it on.
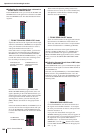
● Making direct output settings
(INPUT channels only)
Use the DIRECT OUT field to make direct-output related
settings for an input channel in the SELECTED CHAN-
NEL VIEW screen. This field includes the following
items.
1 DIRECT OUT popup button
When you press this button, the INSERT/DIRECT
OUT popup window will appear, allowing you to
make settings for insert and direct output.
B DIRECT OUT LEVEL indicator
This indicates the currently specified DIRECT OUT
LEVEL value.
C DIRECT OUT ON/OFF button
Turns the direct output on/off.
To make direct out settings in the SELECTED CHAN-
NEL VIEW screen, press the DIRECT OUT popup button
to access the INSERT/DIRECT OUT popup window (1
ch), and assign an output port to the direct out (→ p. 112).
Press the DIRECT OUT ON/OFF button to turn it on, and
use the DIRECT OUT LEVEL knob to adjust the output
level.
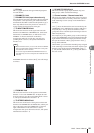
● Setting a channel to Recall Safe
Use the RECALL SAFE field to specify Recall Safe for
the channel that is currently selected in the SELECTED
CHANNEL VIEW screen. This field includes the follow-
ing items.
1 RECALL SAFE popup button
This opens the RECALL SAFE MODE popup win-
dow, where you can make settings related to Recall
Safe.
B PARTIAL indicator
This will light if only some of the parameters of that
channel are set to Recall Safe.
C RECALL SAFE ON/OFF button
Switches the Recall Safe status on/off for the channel.
To set the channel to Recall Safe mode, press the
RECALL SAFE ON/OFF button to turn it on. If you want
to specify Recall Safe only for specific parameters, press
the RECALL SAFE popup window to open the RECALL
SAFE MODE popup window, and then select the parame-
ters for which you want to specify Recall Safe. (For
details on the popup window → p. 148).
• The type of the LOW band EQ or HIGH band EQ cannot be
switched in the SELECTED CHANNEL VIEW screen. If nec-
essary, you can access the EQ popup window and switch the
EQ type.
• If the HIGH band EQ type is already set to Low Pass Filter,
the HIGH band Q knob will not be displayed, and the GAIN
knob will function as an on/off switch for the Low Pass Filter.
• Press the EQ [Q] and EQ [GAIN] encoders simultaneously to
reset the GAIN setting for each band to the default value
(0.0dB).
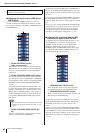
NOTE
1
2
3
1
2
3
2
13