


Multi Edit mode Part Edit
159
Owner’s Manual
Voice mode
Performance
mode
Multi modeUtility modeFile modeMaster mode
Multi Voice
mode
Sequence Play
mode
Reference
Part Edit
[MULTI/SEQ PLAY] (select Multi mode) → Multi selection → [EDIT] → Part selection
These parameters are for editing the individual Parts that make up a Multi.
Press the [F6] button to switch among the various Part displays:
• Display for Parts 1 - 16 to which the internal Voices are assigned.
• Display for Multi-part Plug-in Parts (17 - 32) to which the PLG100-XG voices are assigned.
• Display for Plug-in Parts (PLG1 - 3) to which the Plug-in Voices of the single part Plug-in board are assigned.
n Please note that the Multi-part Plug-in Part (17 - 32) settings apply not to one individual Multi but to all Multis.
n When one of the Multi-part Plug-in Parts (17 - 32) is selected, some parameters cannot be edited.
[F1] VOICE
[SF1] VOICE
Determines the Voice to be assigned to each Part. Select the Part then determine the Voice bank and Voice
number via the same procedure as in the Voice mode (page 73).
n To select the desired Part, move the cursor using the [<][>] buttons or see page 72.
n The Category Search function cannot be used to select the Voices of the Multi Part Plug-in Parts 17-32 (when the PLG
100-XG has been installed).
n You can also change the VOICE NUM (Voice Number) or BANK MSB/LSB (Bank select MSB/LSB) directly using the
Data dial.
[SF1] MODE
Mono/Poly Determine whether the Voice is played back monophonically (single notes only) or polyphonically (multiple
simultaneous notes).
Settings: mono, poly
n This parameter is not available for the Part to which a Drum Voice is assigned.
ArpSwitch (Arpeggio Switch) Determines whether Arpeggio is on or off for the currently selected Part.
Settings: off, on
n Arpeggio Switch is applied to only one Part at the same time. It cannot be applied to multiple Parts simultaneously.
However, only Parts having the same receive channel can be applied simultaneously.
n The “ArpeggioSW” parameter is not available for Multi-part Plug-in Parts 17 - 32.
ReceiveCh (Receive Channel) Determines the MIDI receive channel for the selected Part. Since MIDI data may be coming from many
channels at once, you should set this to match the particular channel over which the desired controlling data is
being sent.
Settings: 01 - 16, off
[SF3] LIMIT
The parameters are the same as in the Performance Edit mode (page 152).
[SF4] PORTA (Portamento)
[SF5] OTHER
[F2] OUTPUT
[SF1] VOL/PAN
The parameters are the same as in the Performance Edit mode (page 153).
[SF2] EF SEND
[SF3] SELECT
[F3] EQ (Equalizer)
The parameters are the same as in the Performance Edit mode (page 154).
[F4] TONE
The parameters are the same as in the Performance Edit mode (page 154).
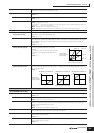
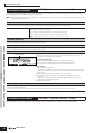
[F5] RCV SW (Receive Switch)
From this display you can set how each individual Part responds to various MIDI data, such as Control Change and Program Change messages.
When the relevant parameter is set to “on,” the corresponding Part responds to the appropriate MIDI data.
Note that two different display types listed below are provided and you can switch between them by pressing the [SF5] button.
Each display type features the same settings in a different format; use the type you feel most comfortable with.
• Display showing four Parts
This display type shows the Receive Switch status for four Parts at a time. Set the desired Part on or off, for the corresponding MIDI data type. To view and
edit another set of four Parts, press the appropriate Number button, [1] to [16]. Keep in mind that since all the available parameters cannot be
simultaneously displayed, you will need to use the cursor controls to scroll the display in order to see and set the other parameters.
• Display showing all parameters for one Part
This display type shows all of the Receive Switch settings for a single selected Part. Set the desired MIDI data type on or off for the selected Part. To select
other Parts, use the Number [1] - [16] buttons (making sure that the [TRACK SELECT] button is on).