


Installing Optional Hardware
187
Owner’s Manual
Appendix
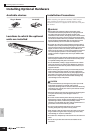
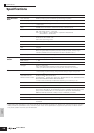
4 Remove the second cover (shown below).
Hold the cover with your hand and remove the two screws.
Keep the removed screws in a safe place. They will be used
when installing the mLAN16E to the S90 ES. Also make sure to keep the
cover in a safe place. Do not leave the cover inside the instrument.
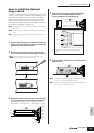
5 Remove the mLAN16E from its package.
6 Attach the sticker label to the front of the mLAN16E.
Remove the protective transparent film from the label, then
apply it to the panel of the mLAN16E.
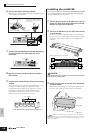
7 Fasten the mLAN16E to the S90 ES.
Insert the mLAN16E into the opening of the instrument with
the panel facing out. While holding the panel with your
hand, fasten the panel to the instrument with the screws
you removed in step #4 above.
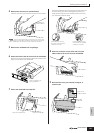
8 Insert the connector on the other end of the flat
ribbon cable to the circuit board of the S90 ES.
9 Re-install the cover you removed in step #3, in
reverse order.
Attach the sticker to the
panel upside down.
Place the mLAN16E here.
Cable connector
Fasten the screw with the
front panel of the mLAN16E
inside the instrument.
Fasten the screw with the
front panel of the mLAN16E
outside the instrument.
Insert this tab
inside the S90 ES.