


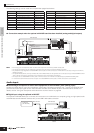
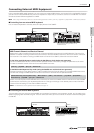

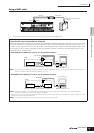
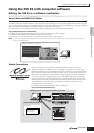

Quick Guide Connecting the Computer and Midi devices
Creating a Song with the Multi mode
72
Owner’s Manual
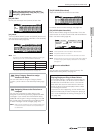
Simple mixing functions (Multi Play mode)
The Multi Play mode gives you convenient editing functions over some basic parameters, and features a graphic mixer—like
layout that allows you to easily check each Part's setting. This mode is useful for changing parameters for each Part even
while song data is being played back from a connected sequencer. Simple mixing functions and basic parameters are
provided in the mode, such as selecting Voices, changing effect settings and so on.
If you want to edit a Multi in greater detail, use the Multi Edit mode (page 74).
When creating a new Multi from scratch, you can conveniently clear the settings for the current Multi beforehand by using
the Initialize function in the Multi Job mode (page 160).
When you play the keyboard, the Voice assigned to the current selected Part will be played.
Pressing the [F6] button switches among the following displays: the display for Parts 1 - 16, to which the internal Voices are
assigned, the display for Multi Plug-in Parts (17 - 32), to which the PLG100-XG voices are assigned, and the display for
Plug-in Parts (PLG1 - 3), to which the Plug-in Voices of the single part Plug-in board are assigned.
Multi Part mute/solo
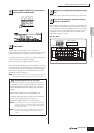
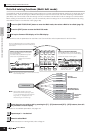
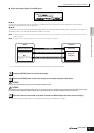
■ To mute a Part
1. Press the [MUTE] button so that its lamp lights.
To turn Mute off, press the [MUTE] button again (the
lamp goes off).
2. Press any of the Number [1] - [16] buttons to
select the Part number to be muted.
The corresponding Part is set to mute (its lamp goes
off) and produces no sound. When pressing the
same number button again, the Part mute is
canceled (its lamp lights).
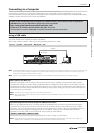
■ To solo a Part
Simultaneously hold down the [MUTE] button and press
one of the Number buttons [1] to [16] to solo the
corresponding Part. Once you've selected a Part for
soloing, the [MUTE] button's lamp flashes, indicating
the Solo function is active. While Solo is active, you can
change the soloed track simply by pressing the
corresponding Number button [1] to [16].
n When selecting a Multi in the Master mode, the mute/solo settings apply not to each Part but to each MIDI transmit channel. Details are the
same as for the mute/solo settings in the Sequence Play mode.
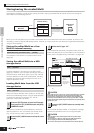
1
Select the Multi you wish to edit according to the instructions in “Using the sounds of the S90 ES for
song playback from a sequencer” on page 70.
2
Turn the [TRACK SELECT] button on and select a Part by using the Number [1] - [16] buttons.
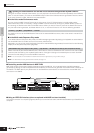
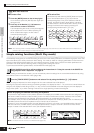
Notes on playing the selected Part using the keyboard
The process of step 2 above not only selects the Part in the display, but the MIDI transmit channel that is assigned to
the same number as the Part number as well (just as in the Voice or Performance mode). Therefore, when the MIDI
receiving channel (ReceiveCh) is changed, the Voice assigned to an unselected Part may sound.
For example, when you set the [TRACK SELECT] button to on and press the number [2] button, Part 2 is selected, and
the MIDI transmit channel of the keyboard is set to channel 2 at the same time.
However, if you've set the MIDI receive channel (ReceiveCh) of Part 2 to channel 3, and the MIDI receive channel of
Part 3 to channel 2, the MIDI data of your keyboard performance is output to channel 2, and Part 3's voice will be
output—instead of the selected Part 2 voice. (See illustration below.)
n The Receive Channel can be set in the Multi Edit mode (page 159).
TIP
ELEMENT/PERF. PART/ZONE
8
7
6
5
4
3
21
16
15
14
12 13
11
10
9
MUTE
TRACK
SELECT
SOLO
ELEMENT/PERF. PART/ZONE
8
7
6
5
4
3
21
16
15
14
12 13
11
10
9
MUTE
TRACK
SELECT
SOLO
Press the buttons simultaneously
ELEMENT/PERF. PART/ZONE
8
7
6
5
4
3
21
16
15
14
12 13
11
10
9
MUTE
TRACK
SELECT
SOLO