


91
Quick GuideCreating Your Original Program Set (Master mode)
Creating Your Original Program Set (Master mode)
Owner’s Manual
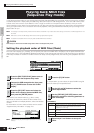
Storing your favorite programs
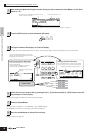
Input a name in the [EDIT] → [COMMON] → [F1] NAME
display.
For detailed instructions on naming a voice, refer to page
27.
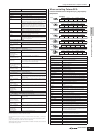
5-1 Press the [STORE] button to enter the Master Store
mode.
5-2 Select the destination Master by using the data dial
or the [INC/YES] and [DEC/NO] buttons.
When you execute the Store operation, the settings for the destination
memory will be overwritten. Important data should always be backed
up to a separate USB storage device (page 127).
5-3 Press the [ENTER] button. (The display prompts
you for confirmation.)
To cancel the Store operation, press the [DEC/NO]
button.
5-4 Press the [INC/YES] button to execute the Store
operation.
Never attempt to turn off the power while an “Executing...” or “Please
keep power on” message is shown. Turning the power off in this state
may cause the system to freeze and prevent normal startup the next
time the power is turned on, as well as resulting in the loss of all user
data.
data.
If you select another Master without storing, the currently edited Master
will be lost. Make sure to store the edited Master before selecting
another Master.
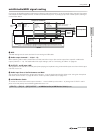
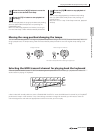
Playing as a master keyboard
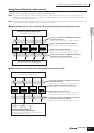
In the Master mode, you can divide the keyboard into (up to) four independent areas (called “Zones”). Each Zone can have
different MIDI channel assignments as well as different functions for the Control sliders. This makes it possible to control
several parts of the multi-timbral tone generator simultaneously by a single keyboard or to control voices of an external MIDI
instrument over several different channels in addition to the internal voices of this synthesizer itself—letting you use the S90
ES to effectively do the work of several keyboards.
You can set the parameters related to the four Zones in the Master Edit mode and store the settings as a User Master.
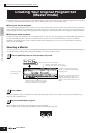
1
Select a Master to be created.
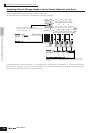
2
Press the [F2] MEMORY button to call up the
Mode setting display.
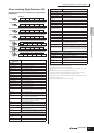
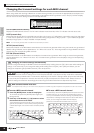
3
Select the desired mode and program number
to register the Mater. If you want to divide the
keyboard into multiple Zones in the Master,
set the Zone Switch to “on.”
4
Name the edited Master.
Determines the mode that called up
when Master number is selscted.
Determines whether Zone
Switch is set to on or off.
Determines the program number that is called up when
the Master is selected.
Input a Master name.
5
Store the edited Master to internal User
memory.
CAUTION
CAUTION
CAUTION
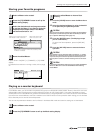
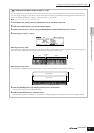
1
Select a Master to be created.
2
Press the [F2] MEMORY button to call up the Mode setting display.