


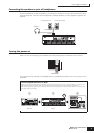


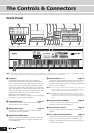


Front Panel
17
The Controls &
Connectors
Owner’s Manual
9 [SF1] - [SF6] (Sub Function) buttons Page 23
These buttons located directly below the LCD display
call up the corresponding sub functions indicated in the
display. In the display hierarchy, these sub functions
[SF] rank just below the functions [F].
These buttons can be also used to store/recall the
Arpeggio type in each Play mode. (page 39)
) LCD Display
The large backlit LCD displays the parameters and
values related to the currently selected operation or
mode.
! [INFORMATION] button Page 27
For calling up a special “help” feature that shows
information about the currently selected mode. You can
go back to the previous display by pressing this button
again or pressing any other button.
Depending on the selected display, this button may be
used to call up a window for inputting characters (page
27), or for selecting keys (page 53).
@ Data dial Page 25
For editing the currently selected parameter. To increase
the value, turn the dial right (clockwise); to decrease the
value, turn the dial left (counter-clockwise). If a
parameter with a wide value range is selected, you can
change the value in broader strokes by quickly turning
the dial.
# [INC/YES] button Page 25
For increasing the value of the currently selected
parameter. Also use it to actually execute a Job or a
Store operation.
$ [DEC/NO] button Page 25
For decreasing the value of the currently selected
parameter. Also use it to cancel a Job or a Store
operation.
n You can also use the [INC/YES] and [DEC/NO] buttons to quickly
move through parameter values in 10-unit jumps, especially those
with large ranges. Simply hold down one of the buttons (of the
direction you want to jump), and simultaneously press the other. For
example, to jump in the positive direction, hold down the [INC/YES]
button and press [DEC/NO].
% Cursor buttons Page 25
The cursor buttons move the “cursor” around the LCD
display screen, highlighting and selecting the various
parameters.
^ [EXIT] button Page 22
The menus and displays of this synthesizer are
organized according to a hierarchical structure.
Press this button to exit from the current display and
return to the previous level in the hierarchy.
& [ENTER] button
Use this button to execute a Job or a Store operation.
Also use this button to actually enter a number when
selecting a Memory or Bank for Voice or Performance.
In the File mode, use this button to go to the next lowest
level in the selected directory.
n In the File mode, the [EXIT] and [ENTER] buttons may be used to
move folders in the USB storage device.
* MODE buttons Page 22
These buttons select the operating modes (e.g., Voice
mode).
( [REMOTE] button Page 78
The Remote mode lets you control sequencer software
on your computer from the panel controls of the
instrument. Turn the [REMOTE] button on to enter the
Remote mode.
n When setting the MIDI IN/OUT parameter to “MIDI” ([UTILITY] →
[F5] MIDI → [SF4] OTHER) or setting both of Mode A and Mode B
to “off” ([UTILITY] → [F4] CTL ASN → [SF4] REMOTE), you cannot
enter the Remote mode even by pressing the [REMOTE] button. Set
these parameters to appropriate values (page 78) then enter the
Remote mode.
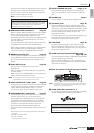
º [EFFECT BYPASS] button Page 119
The extensive effect section of the instrument provides
Insertion effects (eight sets, with two effect units per
set), System effects (Reverb and Chorus), and Master
effects.
The [EFFECT BYPASS] button enables you to turn the
corresponding effect blocks on or off with a single
touch. From the following display, you can select the
specific effect(s) to be bypassed when the [EFFECT
BYPASS] button. [UTILITY] → [F1] GENERAL → [SF3]
EF BYPS display
n If you install an optional Effect Plug-in Board (PLG100-VH), Plug-in
Insertion effects can also be used (page 103).
¡ [ARPEGGIO] button Page 39
Press this button to enable or disable playback of the
Arpeggio for each Voice, Performance, Multi. If the
Arpeggio Switch of the selected part is set to off in the
Performance/Multi mode, however, pressing this button
has no effect.
™ Bank buttons Pages 30, 32
Each button selects a Voice Bank. When the
[CATEGORY SEARCH] button is turned on, these
buttons can be used to select the desired category
(printed below each button).
£ Group [A] - [H] buttons Pages 31, 32
Each button selects a Voice or Performance Group.
When the [CATEGORY SEARCH] button is turned on,
these buttons can be used to select the desired
category (printed below each button).
¢ Number [1] - [16] buttons
Use of these buttons differs depending on the on/off
status of the [TRACK SELECT] and [MUTE] buttons.