


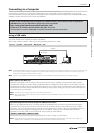

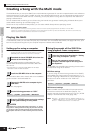


Creating a Song with the Multi mode
73
Owner’s Manual
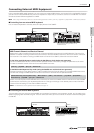
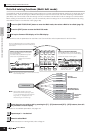
Quick GuideConnecting the Computer and Midi devices
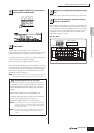
[F2] VOL/PAN
Set the pan and output level (volume) of each Part.
[F3] VOICE
Turn the [TRACK SELECT] button and [MUTE] button to off,
and then select the Voice Bank or Number, in the same way
as in the Voice mode (page 30).
n Bank
By selecting the “BankMSB/BankLSB” parameter and using the
data dial, you can call up the Voice Banks listed below.
* For details about Plug-in Board Voices, see page 100.
[F4] EF SEND (Effect Send)
Adjust the Reverb/Chorus Effect for each Part.
For details about the effect settings, see page 123.
[F5] VCE ED (Multi Voice Edit)
Edit the Normal Voice assigned to each Part. This is the
same function as in both Common Edit and Voice Element
Edit in the Voice mode (page 45).
n Certain parameters cannot be edited in Multi Voice Edit.
n Only Normal Voices can be edited.
n A Voice edited with this function will be saved as a User Voice.
n Please note that the functions of the [F5] and [F6] buttons depend
on whether the [F1] PLAY display is selected or not. For details,
see page 157.
You can store up to 64 Multis to internal memory. For
details about storing Multis, see page 76.
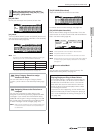
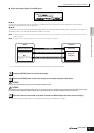
3
Select the desired display, then edit the
desired parameters by using the [F1] - [F6]
and [SF1] - [SF5] buttons.
Normal Voice Drum Voice Plug-in Voice
Pr 1 - 4: Preset PD: Preset Drum Pp: Plug-in Preset
GM GD: GM Drum Pu1: Plug-in User
Us 1 - 2: User UD: User Drum PB: Plug-in Board *
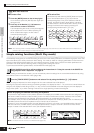
Using Category Search to assign
Voices to the Parts
You can select Voices using the Category Search
function, just as is done in the Voice Play mode (page
32).
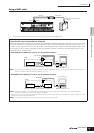
Assigning Voices to the Parts from a
computer
You can use a computer to select Voices to be
assigned to the Parts by specifying appropriate MIDI
messages. If you transmit the relevant Bank Select
MSB/LSB and Program Change messages to the S90
ES, the Part Voice corresponding to the MIDI channel
of these messages can be changed (page 107).
n Make sure that the MIDI Channel of the MIDI message is set
to the same value as the Receive Channel (ReceiveCh) of
the desired Part.
TIP
TIP
4
Store the edited Multi.
Playing Single-part Plug-in Board Voices
In the default settings, the Receive Channels are set
to 1 for the PLG1 Part, 2 for PLG2, and 3 for PLG3. If
the MIDI Port for a PLG Part is set to 1, the internal
Parts which are set to the same receive channel as
that of the Plug-in Part are also played when a Note
On message is received.
To prevent this from happening, set the receive chan-
nels of the Parts that you want to keep from playing to
“off,” or set the MIDI port of the Plug-in Part(s) to “2” or
“3” (page 100).