


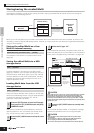

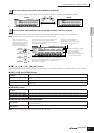

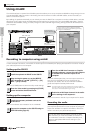
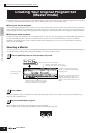

Using the S90 ES with computer software
84
Owner’s Manual
Quick Guide Connecting the Computer and Midi devices
When turning the [VOLUME] button off, the Control sliders on the S90 ES are assigned to perform
the same functions as the Knobs on the DAW controller.
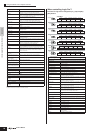
When controlling Logic Pro 7:
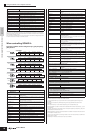
Functions of Logic Control assigned to [F1] - [F6] and [SF1] -
[SF5] buttons
[AUX/BUS] Opens the AUX/BUS window or brings it to the front of the
computer screen (when the Audio Mixer is active).
[OTHER] Starts the Audio Mixer or brings it to the front of the computer
screen. This operation applies to the Effect Module software.
(Only PAN is available in the R settings.)
[BANK </>] Scrolls through the track indication every eight channels.
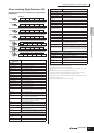
[SHIFT]+[F1] Brings the Track View window to the front of the computer
screen. (This operation applies to the current song.)
[SHIFT]+[F2] Starts the Mixer window (Audio Mixer/Multi Part Editor) or
brings it to the front of the computer screen.
[SHIFT]+[F3] Opens the List window or brings it to the front of the computer
screen.
[SHIFT]+[F4] Closes the current window.
[SHIFT]+[F5] Opens the Piano Roll window or brings it to the front of the
computer screen.
[SHIFT]+[F6] —
[SHIFT]+[F7] Starts the TWE (Wave Editor).
[SHIFT]+[F8] Alternately hides/shows the Transport window (Transport Bar/
Location Bar/Record).
[RWD] Press briefly to move back one measure at a time, or hold to
continuously rewind.
[FF] Press briefly to move forward one measure at a time, or hold
to continuously fast-forward.
[STOP] Press to stop recording or playback. Pressing this when
playback is stopped goes to the top of the song.
[PLAY] Press to start playback from the current point.
[REC] Press this to enter/exit from the Recording Standby. The [F]
(Play) and [I] (Rec) lamp are turned on during recording.
[SCRUB] Determines how the Scrub function is applied when using the
dial. When this is set to on, Scrub moves according to the
Grid position in the Track View window. When set to off, it
moves in measures.
[UP] (with the [ZOOM] lamp
turned off)
Moves the cursor (indicating the current track) up.
[DOWN] (with the [ZOOM]
lamp turned off)
Moves the cursor (indicating the current track) down.
[LEFT] (with the [ZOOM]
lamp turned off)
Selects the next block.
[RIGHT] (with the [ZOOM]
lamp turned off)
Selects the previous block.
[ZOOM] Turns Zoom on and off.
[UP]/[DOWN]/[LEFT]/[RIGHT]
(with the [ZOOM] lamp turned
on)
Zooms in/out in the active Track View and Piano Roll Window.
PAN mode [PAN]
Knobs 1 - 8 (tweaking) Edits the Pan (on page 1).
Knobs 1 - 8 (tweaking) Edits the Input level (on page 2).
[SHIFT] + Knobs 1 - 8
(pressing)
Resets the edited parameter to the default value (CENTER/
0.00).
AUX SEND mode [SEND] (Not available when the AUX/BUS window is active.)
Knobs 1 - 8 (tweaking) Edits the AUX Send Level.
[SHIFT] + Knobs 1 - 8
(pressing)
Resets the edited parameter to the default value (-∞).
EFF SEND mode [EFFECT] (Not available when the AUX/BUS window is active.)
Knobs 1 - 8 (tweaking) Edits the Effect Send Level.
[SHIFT] + Knobs 1 - 8
(pressing)
Resets the edited parameter to the default value (-∞).
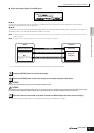
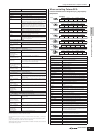
Button/Controller
names on 01X
Functions
Button/Controller
names on Logic Control
Functions
In all modes:
[NAME/VALUE] Changes the indication of the parameter name and its value.
[SHIFT]+[NAME/VALUE] Changes the meter display mode.
[SEL] Selects a channel.
[MUTE] Mutes or unmutes each channel.
[OPTION]+[MUTE] Sets all channels to on.
[SOLO] Sets the Solo of each channel to on or off.
[OPTION]+[SOLO] Sets the Solo of all the channels to off.
[REC RDY] Sets the REC RDY of each channel to on or off.
[OPTION]+[REC RDY] Sets the REC RDY of all the channels to off.
[MIDI TR] Makes the Global View mode active and displays the MIDI
track with the Multi Channel view.
[INPUT] Makes the Global View mode active and displays the AUDIO
INPUT object with the Multi Channel view.
[AUDIO TR] Makes the Global View mode active and displays the Audio
track with the Multi Channel view.
[AUDIO INST] Makes the Global View mode active and displays the Audio
Instrument track with the Multi Channel view.
[AUX] Makes the Global View mode active and displays the AUX
object with the Multi Channel view.
[BUSSES] Makes the Global View mode active and displays the BUS
object with the Multi Channel view.
[OUTPUT] Makes the Global View mode active and displays the AUDIO
OUTPUT object with the Multi Channel view.
[GLOBAL VIEW] Switches between the Global View mode and Track View
mode.
[BANK </>] Scrolls through the track indication every eight channels.
[CHANNEL </>] Scrolls through the track indication channel-by-channel.
[SHIFT]+[FLIP] Exchanges the functions between the Channel Knobs and the
Faders.
[FLIP] Assigns the function of the Channel Knob to the Fader.
[NUDGE] Turns Nudge on or off.
[SHIFT]+[NUDGE] Enters the Nudge Option mode.
[CYCLE] Turns Loop on or off.
[SHIFT]+[CYCLE] Enters the Cycle Option mode.
[F1] - [F7] Calls up Screen Sets 1 - 7.
[F8] Closes the window located at the front of the computer or
floating window.
[UNDO] Executes the Undo operation.
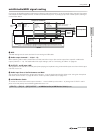
ASSIGNMENT
FADER BANKS
PAN/SEND
PAN/SEND
TONE
GLOBAL VIEW
ARP FX
UTILITIES
EQ
TONE
TONE
ARP FX
ARP FX
EQ
SEND
TRACK PAN/SURND EQ BANK-L BANK-R SHIFT
PLUG-IN INSTRUMENT DIAL RESET KN1-4/5-8
FLIP
CHANNEL-L CHANNEL-R BANK-L BANK-R SHIFT
NAME/VALUE DIAL RESET KN1-4/5-8
AUX
MIDI TR INPUTS AUDIO TR AUDIO INST GLOBAL VIEW SHIFT
BUSSES OUTPUTS USER KN1-4/5-8
SAVE
CANCEL ENTER BANK-L BANK-R SHIFT
UNDO NAME/VALUE DIAL RESET KN1-4/5-8
F5
F1 F2 F3 F4 SHIFT
F6 F7 F8 KN1-4/5-8
NUDGE
MARKER CYCLE REPLACE SOLO SHIFT
DROP CLICK DIAL RESET KN1-4/5-8
CURSOR-L
CURSOR-DWN
CURSOR-UP ZOOM BANK-L BANK-R SHIFT
CURSOR-R SCRUB DIAL RESET KN1-4/5-8