


Using the mixer functions & effects
106
r
G-70 Music Workstation
There is only one USER memory. By saving your new
settings, you therefore overwrite the previous ones.
(8) Press the [Back] field if you want to set the compres-
sor, or the [EXIT] button to return to the main page.
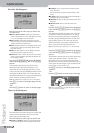
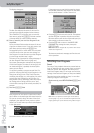
Compressor
This is in fact a multi-band compressor/limiter that
allows you to specify the amount of signal compression
for three frequency ranges. A compressor reduces high
levels (peaks) and boosts low levels, smoothing out
fluctuations in volume.
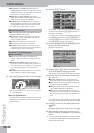
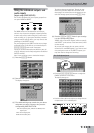
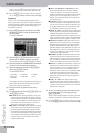
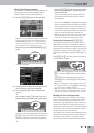
(1) On the EFFECTS page (see above) press the COM-
PRESSOR [EDIT] field to access the parameters of
the same name.
The display changes to:
(2) Press the [ON] (or [OFF]) field to switch the com-
pressor on (icon lights) or off (icon goes dark).
You can also do so on the EFFECTS page (see above).
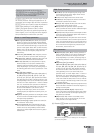
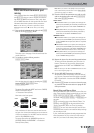
(3) Press the field below “COMPRESSOR” that displays
the name of the currently selected preset.
(4) Select the desired preset with the [DATA÷ENTRY]
dial or the [DEC]/[INC] buttons.
The available presets are:
The settings you make on this page can be saved to a
User memory and recalled as and when necessary.
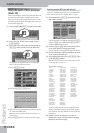
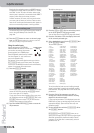
Here’s how to edit the parameters:
(5) Press the field of the parameter you wish to
change.
(6) Set the desired value with the [DATA÷ENTRY] dial or
the [DEC]/[INC] buttons.
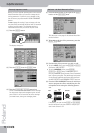
● BC LEVEL (0~127)—Use this parameter to set the com-
pressor’s input level. The higher the value, the stronger
the three frequency bands wil be compressed. The value
you set here is thus added to the LEVEL settings of the
three bands. If you set this parameter to “0”, the com-
pressor has no effect on the output signal.
● BC GAIN (–24~0~24dB)—Use this parameter to correct
the level at the compressor’s outputs. If the settings of
the remaining parameters lead to a significantly lower
level (which can be checked by switching the compressor
on and off for A/B comparisons), select a positive value.
If your settings lead to a significantly higher level, select
a negative value. “0” means that the level is neither
boosted nor attenuated.
● SPLIT 1 (200~800)/SPLIT 2 (2000~8000)—On other
devices, these parameters are sometimes called the
“cross-over frequency”, i.e. the frequency where two
bands are separated. As the compressor has three bands,
there are two cross-over frequencies you can set: “1”
between the low and mid ranges, and “2” between the
mid and high ranges.
● Lo/Mid/Hi—Because the remaining parameters are the
same for each band, we will only discuss them once. As
you see, each of the three frequency ranges has its own
set of parameters that allow you to specify their behav-
ior. The width of the three band can be set with…
● ATTACK (0~100ms)—Use this parameter to specify how
fast the compressor of the band in question should start
compressing the signal once the level of that band
exceeds the THRSHLD level. Choose a smaller value if you
prefer a compression similar to that of FM radio stations.
Higher values may yield a “snappier” or “funkier” sound.
● RELEASE (50~5000ms)—This parameter allows you to
specify how fast the compressor of the corresponding
band should stop working when the signal level drops
below the THRSHLD value. The “right” setting for this
parameter depends on the RATIO value you select. If the
level jumps between notes are too abrupt (a phenome-
non known as “pumping”), increase the value until the
transitions seem a little smoother.
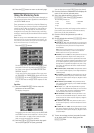
● THRSHLD (–36~0dB)—This parameter allows you to set
the level the frequency band in question must have in
order to trigger its compressor. The lower the value, the
more noticeable the compression will be (flattening out
whatever level differences that may have been there).
● RATIO (1:1.0~1:INF)—use this parameter to specify how
strongly the level of signals that exceed the THRSHLD
level is to be reduced. “1:2.0”, for example means that
the level values in excess of the THRSHLD level are
halved. The “1:INF” is useful if you set THSRHLD to “0dB”,
or thereabout. This produces a limiter effect, which
means that no signal level will never exceed the THR-
SHLD value. This may help you protect the speakers of
the PA system etc.
● GAIN (–24~+24dB)—This parameter allows you to
establish the desired mix among the three compressor
bands. Choose a negative value to decrease the level, or
a positive one to increase it. Choose “0” for a band that
should not be compressed.
(7) To save the settings you have just made (in order
to use them again at a later stage), press the
[WRITE¥USER] field.
There is only one USER memory. By saving your new
settings, you therefore overwrite the previous ones.
(8) Press the [BACK] field if you want to set the compres-
sor, or the [EXIT] button to return to the main page.
1. Hard Comp
2. Soft Comp
3. Low Boost
4. Mid Boost
5. High Boost
6. Standard
7. User