


Appendix
228
r
G-70 Music Workstation
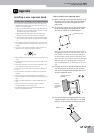
(5) Use the screws that you removed in step 2 to fas-
ten the cover back in place.
■Checking whether the board is recognized
After installing the wave expansion, check to confirm
that the installed board is recognized correctly.
(1) Turn on the power, as described in “Switching the
G-70 on/off” on p. 21.
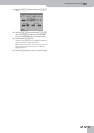
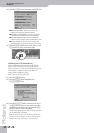
(2) Press the [MENU] button and the [UTILITY] field.
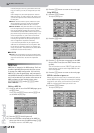
(3) Press the [INFO] field to select the following page:
Check whether the name of the installed Wave
Expansion Board is displayed.
If “No SRX Card” is displayed next to “SRX Expansion
Board”, the wave expansion board is not recognized.
Re-install the wave expansion board correctly.
(4) Press [EXIT] to return to the main page.
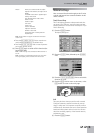
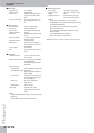
Accessing the ‘Patches’ of SRX-
series expansion boards via MIDI
As you will notice, the CC00 number is always “93”. The
CC32 value, on the other hand, depends on (i) the board
you installed and (ii) the sound you need.
The MIDI standard can only handle 128 program
change numbers, which is why boards with more than
128 Patches use several consecutive CC32 values.
Patches CC00 CC32
SRX-1 1~41 93 00
SRX-2 1~50 93 01
SRX-3 1~128 93 02
SRX-4 1~128 93 03
SRX-5 1~128 93 04
SRX-5 129~256 93 05
SRX-5 257~312 93 06
SRX-6 1~128 93 07
SRX-6 129~256 93 08
SRX-6 257~384 93 09
SRX-6 384~448 93 10
SRX-7 1~128 93 11
SRX-7 129~256 93 12
SRX-7 257~384 93 13
SRX-7 385~475 93 14
SRX-8 1~128 93 15
SRX-8 129~256 93 16
SRX-8 257~384 93 17
SRX-8 385~448 93 18
SRX-9 1~128 93 19
SRX-9 129~256 93 20
SRX-9 257~384 93 21
SRX-9 385~414 93 22
SRX-10 1~100 93 23