


Auditioning your Style and adding more tracks
G-70 Music Workstation
r
185
Saving your Style
Make it a habit to save your Styles as frequently as pos-
sible. After all, if someone decided to turn off your G-70
now, you would lose everything you have programmed
so far.
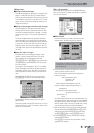
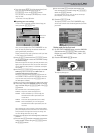
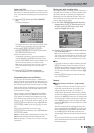
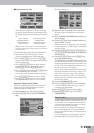
(1) Press the [SAVE] field on the STYLE COMPOSER
page.
The display changes to:
This page allows you to save the current Style to the
internal memory, a memory card or a floppy disk.
• Press the [EXTERNAL¥MEMORY], [FLOPPY] or
[INTERNAL¥MEMORY] field to select the area where
you want to save the Music Style.
• Enter the name for the file.
See page 49. If necessary, you can also supply the
required COUNTRY and GENRE information for use
with the STYLE FINDER function (only available if you
select the internal memory or a memory card).
Note: The G-70 supports both upper- and lower-case letters
for file names. Choose whichever is more convenient (or
clearer).
(2) Press the [EXECUTE] field to save the data.
The G-70 returns to the STYLE COMPOSER page.
Programming other parts and divisions
You can now record the second part – probably the
bass. If you’d like to do the guided tour again, return to
page 181. Do not forget to set the key for the bass part
(see “Specifying the key (for melodic parts)” on p. 182).
Once the first Division is finished, you can record other
Divisions. Use the clone function (page 182) to record
several patterns in one go.
Do not forget to record the Fills and the Intro(s)/End-
ing(s) to complete your Style. Fill-Ins are short transi-
tions (usually one measure) that announce new song
parts. There are two groups of three fills: “Up” 1~3 and
“Dwn” 1~3. “Up” fills are used when you switch on the
[AUTO¥FILL¥IN] button and then press a VARIATION but-
ton of a higher number (to go from [1] to [2], for exam-
ple).
“Dwn” fills are used when you switch on the
[AUTO¥FILL¥IN] button and then press a VARIATION but-
ton of a lower number.
Intros are usually used at the beginning of a song, and
End patterns provide professional closing sections.
Note: The ABass part is monophonic. You can only record single-
note patterns.
Muting parts while recording others
After programming a few tracks, you may find that cer-
tain parts tend to confuse you. Playing a steady organ
part while listening to a previously recorded synco-
pated guitar line may indeed be difficult. That is why
the G-70 allows you to mute parts that you do not
want to hear during recording.
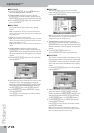
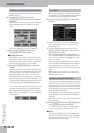
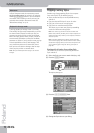
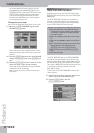
(1) On the STYLE COMPOSER page (which should be
displayed now), the [MUTE] field and the lines of
the Style tracks you don’t want to hear. Such
tracks are flagged with an “M”.
(2) Press the [MUTE] field again to switch off the func-
tion of the same name.
Note: The on/off status only applies to the STYLE COMPOSER
page. During normal Arranger playback, all tracks that contain
data are played back. Use the Erase function to remove parts
that should not appear in your accompaniments (see p. 192).
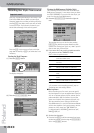
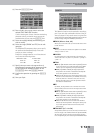
■Solo
If you need to listen to a track in isolation, press the
[SOLO] field and the field of the track you want to
solo, and start playback. This mutes all other tracks,
while the selected track is flagged with an “S”. You
can also select the track to be soloed using the [ß][†]
buttons.
Press the [SOLO] field again to switch off the func-
tion of the same name.
Remarks
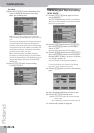
■Working from top to bottom – programming
hints
If you listen carefully to the factory Styles, you will
notice that most divisions are very similar to one
another and that the element of “evolution” or
“amplification” between the various levels is usually
derived from adding instruments to otherwise identi-
cal parts. The MAIN [2] division may, for instance, add
an electric guitar to the drums, bass, and organ lines
of the MAIN [1] level, but the drum, bass, and organ
lines of the MAIN [2] level are often identical to those
of the [1] level.
Therefore: always start by recording the most com-
plex accompaniment (e.g. MAIN [4]) while cloning all
other looped divisions (page 182). If you then move
to the MAIN [3] Division and delete the bells and
whistles (page 192), that division already sounds sim-
pler.
The next step would then be to select the MAIN [2]
pattern and delete both the bells and whistles and
the distorted guitar.