


Using the 16-track sequencer
156
r
G-70 Music Workstation
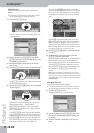
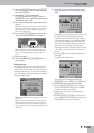
(4) Press the following three fields and enter the
desired values using the [DATA÷ENTRY] dial or the
[DEC]/[INC] buttons.
● Tempo—Allows you to specify the initial tempo of the
new song (q= 20~250). Choose a tempo that is comfort-
able for recording. You can set the final tempo by editing
the MASTER track (see p. 171) or by recording it after
activating the TEMPO REC SW parameter (see p. 157).
● Time Signature BEAT—If your new song uses the 4/4
time signature, there is no need to change this value.
Otherwise, enter the desired time signature (1/2~32/16).
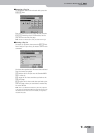
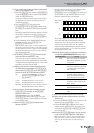
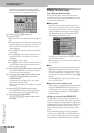
The warning alerts you to the fact that pressing
[EXECUTE] may have disastrous consequences. See
“Saving your song” on p. 159 if you still need to save
your previous song.
■Using two drum tracks
He G-70 allows you to use as many drum tracks as
you like: simply assign a Drum Set to the desired
track and start playing. This requires no particular ini-
tialization procedure.
Track 10, however, can only play Drum Sets and
should therefore be used for your main percussion
applications. But feel free to add a “beat box” or
orchestral percussion to a song that also requires a
“regular” drum kit.
(5) Press the [EXECUTE] field to really initialize the
Song RAM memory (which you haven’t done so
far).
The G-70 now initializes the song RAM memory and
jumps to the main 16-track Sequencer page.
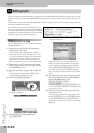
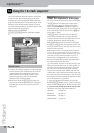
Preparations
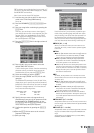
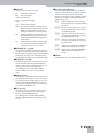
(6) Press the RECORDER [REC¥∏] button.
The display changes to:
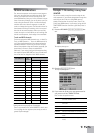
(7) Press the [REC¥TRK] field and use the [DATA÷ENTRY]
dial or the [DEC]/[INC] buttons to select the track
you want to record to.
(8) Press the [REC¥TYPE] field and use the
[DATA÷ENTRY] dial or the [DEC]/[INC] buttons to
specify how the following tracks should behave
(the other tracks are always “GS tracks”):
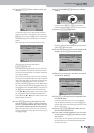
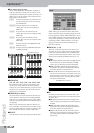
(9) Assign the desired sound to the recording track
you selected.
See “Selecting sounds for the Keyboard parts” on
p. 29. You can play on the keyboard to check whether
the sound matches the mood of the part you wish to
record.
(10) Specify how the data will be added to the track
during recording (REC MODE):
Select “Replace” if a track contains data you wish to
replace with new data. This erases all data of the
selected track from the place where you start record-
ing until the end. (“Replace” is selected by default for
empty tracks.)
Select “Mix” to add new notes to the ones already
recorded on the selected track. This recording mode is
particularly useful for recording the rhythm track
(10) because you can first record the bass and snare
drums, then add a few tom hits here and there, and
record the HiHat, for example.
(“Mix” is selected by default for tracks that already
contain data.)
JAZZ Selects sounds suitable for jazz combos.
ETHNIC Selects sounds suitable for world music.
REC
●
Track REC TYPE
1~3 Fixed GS (cannot be changed)
4 GS*,
[*] The track uses sounds of the G-70’s GM2/GS sound source and
is not linked to the Keyboard part shown right.
UP1**
[**] The track uses the same sound as the Keyboard part it is
linked to. In the case of the UP1, LW1 and MBS parts, this can
also be the corresponding Harmonic Bar part. Keyboard parts can
use an SRX sound (while regular Song parts cannot). The impor-
tant thing to remember is that whenever you assign a different
sound to the connected Keyboard part, the track in question au-
tomatically switches to that sound as well.
5 Fixed GS (cannot be changed)
6 GS*, UP2**
7~10 Fixed GS (cannot be changed)
11 GS*, LW1**
12 GS*, MBS**
13 GS*, UP3**
14 GS*, LW2**
15 GS*, MELODY INTELL**
16 Fixed GS (cannot be changed)
g
KEYBOARD PART/
MELODY INTELL
Track Track
If you select “GS” (or if
there is no alterna-
tive).
If you select the corre-
sponding part.
Sound (and tone
generator) of the
selected part.
Song parts