


24 Basic setups
Changing microphone settings
Models SE and DL
Changing microphone settings
Microphone settings
This procedure applies only to Class/Type 1 models.
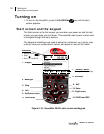
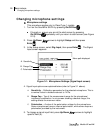
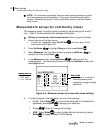
1. Turn on the SoundPro SE/DL by pressing On/Off/Esc .
• If turned on, ensure you are at the start screen by pressing
On/Off/Esc repeatedly until you return to start screen (see Figure
2-10).
2. Press Up/Down arrows to highlight Setup and then press
Enter .
3. In the Setup screen, select Sig. Input, then press Enter . The Signal
Input screen appears.
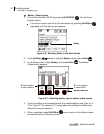
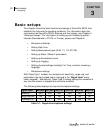
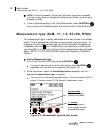
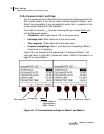
Figure 3-1: Microphone Settings (Signal Input screen)
4
. Signal Input options are explained below (refer to Figure 3-1 above).
A. Sensitivity ~ Calibration parameter for the selected microphone. This is
a nominal value in decibels relevant to 1V/Pa.
B. Range Cap ~ Top of the measurement range for the microphone/
instrument combination. In any screen showing a decibel range, this
setting affects the maximum value.
C. Polarization ~ A value of the polarization voltage for the microphone.
Some microphones have an internal polarization, while others require a
polarization provided by the instrument.
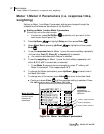
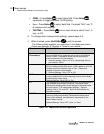
5. To change a signal input field, press Up/Down arrows to highlight
specific field (s).
A. Sensitivity
B. Range Cap
C. Polarization
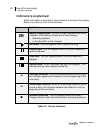
Menu path displayed