


45 Setting up auto-run
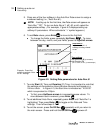
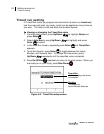
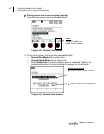
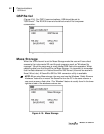
Level-triggered auto-on setting
Models SE and DL
Level-
Triggered
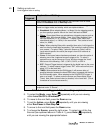
Explanation of Settings
B. Action
After selecting specific filter mode settings, the instrument is set to trigger
based on Run/Pause mode or Run/Stop mode.
C. Source
The source can be set to Meter 1, Meter 2, filters, curve, external trigger,
timed run trigger mode, and a delay. which are explained below:
• Broadband: When selecting Meter 1 or Meter 2 for the triggering source,
you then specify a specific value in the “level” field such as 85dB.
• Filters: Octave band filters are selectable as a triggering source such as:
12.5Hz, 16Hz, 20Hz through 20KHz. Note: this is only available if they
have purchased the 1/1 or 1/3 features. To select a filter, select a an
octave band value (.i.e. 10KHz) in the source field. Then, select a Level
value (i.e., 90dB).
• Delay: When selecting Delay with a specified time value, it will trigger the
auto-run after the timed-delay surpasses. (This is similar to setting a delay
on a camera.) To select “Delay”, select the Source as “Delay” and for
Level select a specific time value (the range is from 00:01 seconds to
59:00 minutes).
• Curve: If the curves feature has been purchased, you have the option of
selecting one of the 4 captured curves to trigger a run. To select a
captured curve, set the Source as “Curve” and then change the “Level”
field to one of the following: CAP-1, CAP-2, CAP-3, or CAP-4.
• EXT: External Trigger feature is triggered by the digital input on the curve
indicator. To select external trigger, select “EXT” as the source field, and
select “LO” for the level field.
• TIMED: When selected as the RUN trigger, it will cause a delay of
specified direction between the timed RUN button is pressed and the time
the RUN actually starts. When selected as the PAUSE/STOP trigger, it
sets a run length. To select under the Source and Pause fields, chose
Timed. Next, select a timed value (or duration) in the Level field. (This is
formatted as hours:minutes:seconds.)
D. Level
The level field corresponds with your selection from the Source field and is
explained under “C. Source”.
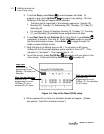
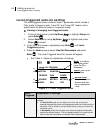
Table 4-1: Level Triggered Auto-On settings explained
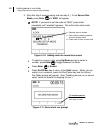
5. To select the Mode, press Enter repeatedly until you are viewing
either Level On/Off or Windowed.
6. To move to the next field, press the Down arrow.
7. To set the Action, press Enter repeatedly until you are viewing
either Run/Pause or Run/Stop.
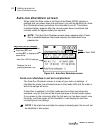
8. To move to the next field press the Down arrow.
9. To change the Source, press the right arrow. To select one of the five
Sources (as explained above in Table 4-1), press Enter repeatedly
until you are viewing the appropriate feature.