


73 Back-erasing
Results of back-erasing
Models SE and DL
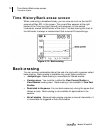
Results of back-erasing
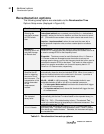
Back erasing causes the following changes to the study and to the session in
which the study occurs.
• Run times - The run time of the back-erased study is shortened by
the duration of the removed segment. The run time of the session is
also reduced by the same amount.
• Measurements - All measurements that use data that was removed
by back-erasing are corrected, as appropriate. For example, if the
maximum SPL had occurred in that erased segment, the instrument
re-evaluates the remaining data in the study to find a different
maximum value.
• Meters - Back-erasing applies on the same basis to both meters.
• Storage - The session file is corrected to reflect the new run times
and other changes that resulted from the back-erasing.
• Back erased raw data - The raw data that you removed by back-
erasing is saved in the session’s file. You can post-edit back-erased
data with DMS software.
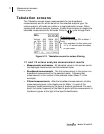
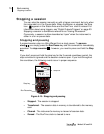
How to back-erase
1. While running a study, view the Time Log screen in either the View
Current Study or the View Session viewing area.
2. If you see data that you would like to remove from the study, press the
pause key to pause the study.
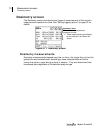
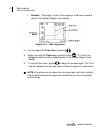
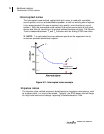
3. Press the left arrow to move the back-erase Time Line from right to left.
With reference to the Time Log figure below, the Time Line starts at the
Zero Marker and can be moved all the way across the screen to the 20-
second Marker. All of these characteristics help you identify the segment
to be back- erased.
• Zero Marker - Identifies the end of the back-erased segment. This is
always the end of the study.
• Time Line - Identifies the beginning of the back-erased segment.