


55 Communications
GPS
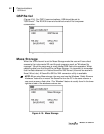
Models SE and DL
• Status line - This data field at the right on this line tells you whether GPS is
enabled or not. You may see “No Fix” below this line, which tells you that,
although enabled, the instrument is not receiving the satellite signal.
• Position line - When the satellite signal is being received, there will be two
data fields on this line that give the instrument’s latitude (N or S) and
longitude (E or W) position in degrees and minutes.
• Other line - When the satellite signal is being received, there will be two
data fields on this line that give the instrument’s altitude and time, in that
order. The altitude is given in meters above mean sea level. The time is
given for Greenwich, England (GMT) and differs in hours from your time by
the number of time zones between your location and Greenwich.
Enabling GPS communications
1. If a session is running, stop it.
2. Connect the RS-232 cable to the GPS receiver and to the auxiliary
port of the SoundPro SE/DL instrument (“Auxiliary port” on page 7).
3. Referring to the user manual for the GPS receiver, prepare the device
to receive satellite signals.
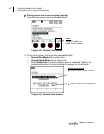
4. In the SoundPro SE/DL Setup screen, press the arrow keys to
select Comm-Set, then press , and the Comm-Set screen
appears.
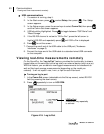
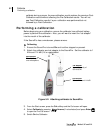
Figure 4-18: Viewing GPS coordinates in COMM-Set screen
5. Press the down arrow to highlight “RS-232”.
6. Repeatedly press until “GPS” is displayed. The Baud rate should be kept
at 4800 unless otherwise specified by your GPS manufacturer.
NOTES: If you are not using RS-232 communications in any way, you
should keep the RS-232 channel set to the Off/Lo-Pwr setting.
Viewing GPS coordinates