


128
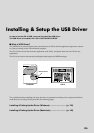
Installing & Setting Up the Driver (Windows)
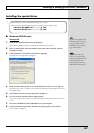
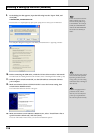
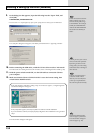
9.
In the dialog box that appears, input the following into the “Open” field, and
click [OK].
D:\DRIVER\USB_XP2k\SETUPINF.EXE
* The drive name “D:” may be different for your system. Specify the drive name of your CD-ROM drive.
fig.11-030
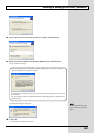
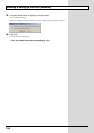
The “SetupInf” dialog box will appear, with “Ready to install the driver” appearing in the box.
fig.11-040
10.
Before connecting the USB cable, switch the GS-10’s driver mode to “Advanced.”
For instructions on switching the GS-10’s driver modes, refer to “Switching the Driver Mode” (p. 80).
11.
With the power switch turned OFF, use the USB cable to connect the GS-10 to
your computer.
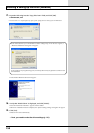
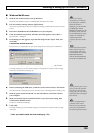
12.
Make sure that the GS-10’s OUTPUT LEVEL is set to the lowest setting, then
switch ON the POWER switch.
The “Found New Hardware Wizard” will appear.
fig.11-050
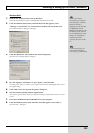
13.
Make sure that the screen indicates “BOSS GS-10”, select “Install from a list or
specific location (Advanced)”, and click [Next].
The screen will indicate “Please choose your search and installation options”.
In this manual, the location of
folders and files is given in
terms of the file path, using \
as the delimiter. For example,
WinXP_2k\SETUPINF.EXE
indicates the SETUPINF.EXE
file found in the WinXP_2k
folder.
Turn on power to your various
devices in the order specified.
By turning on devices in the
wrong order, you risk causing
malfunction and/or damage to
other devices.
This unit is equipped with a
protection circuit. A brief
interval (a few seconds) after
power up is required before
the unit will operate normally.