


131
Installing & Setting Up the Driver (Windows)
Windows 2000
1.
With the GS-10 disconnected, start up Windows.
Disconnect all USB cables except for a USB keyboard and USB mouse (if used).
2.
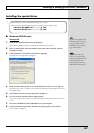
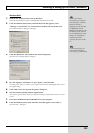
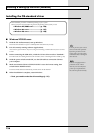
Click the Windows Start button, and from the menu that appears, select
“Settings | Control Panel.” In “Control Panel,” double-click the System icon.
The “System Properties” dialog box will appear.
fig.11-130
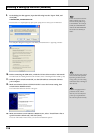
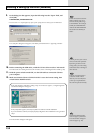
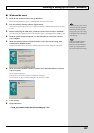
3.
Click the “Hardware” tab, and then click [Driver Signature].
Open the “Driver Signing Options” dialog box.
fig.11-140
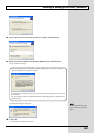
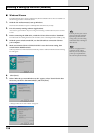
4.
the “File signature verification” is set to “Ignore,” and click [OK].
If currently set to “Warn” or “Block,” set it to “Ignore” here, then after installing the driver, restore
the original setting.
5.
Click [OK] to close the “System Properties” dialog box.
6.
Exit all currently running software (applications).
Also close any open windows. If you are using virus checking or similar software, be sure to exit it
as well.
7.
Insert the CD-ROM into the CD-ROM drive of your computer.
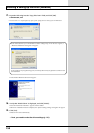
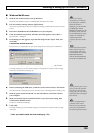
8.
Click the Windows start button. From the menu that appears, select “Run...”.
Open the “Run...” dialog box.
If the GS-10 is already
connected to your computer
and a message of “Add New
Hardware Wizard” is
displayed, go to the included
CD-ROM folder named
DRIVER\USB_XP2k, open the
file Readme_e.htm, and read
the “Troubleshooting” section
entitled “You attempted to
install using the above
procedure, but were not able
to.”
You must log on using a user
name with an administrative
account type (e.g., Administrator).