


2-6
Startup
Playing the Presets
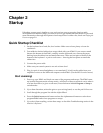
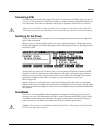
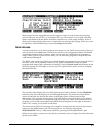
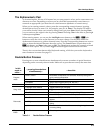
In the following diagram, Channel 2 is the current channel, but Channel 1 is the KB3 channel.
The info box tactfully lets you know what the KB3 channel is, and parentheses appear around
the names of all KB3 programs, to further remind you that KB3 programs aren’t available on the
current channel. To get Program 753 to work in this case, you’d have to change the current
channel back to Channel 1, or go to Master mode and change the KB3 channel to Channel 2.
ProgramMode||||Xpose:0ST|||<>Channel:2||
!!!!!!!!!!!!!!!!!!@|751|(Prog|Rock|Organ
KB3|Program|||||||#|752|(Syn|Rock|Organ)
|Mellow|Vox|||||||#|753|(Dirty|Syn|B)|||
||||||||||||||||||#|754|(CleanFullDrawba
KB3Chan|is|Ch|1|||#|755|(Loungin)|||||||
%%%%%%^%%%%%%^%%%%$|756|(Mild|Grunge)|||
Octav-|Octav+|Panic||Sample|Chan-||Chan+
Live Mode Programs
Programs 740–749 are designed expressly for Live mode, a feature that enables you to take a
signal from the Analog sampling input (this requires the sampling option, of course), and route
it through the DSP algorithms. Programs 740–749 will not play unless you’re receiving a signal
at the Analog sampling input. See page 14-10 for more about Live mode.
Selecting Programs
When you want to change programs, you have several options.
The easiest method is the Alpha Wheel. Turning it left or right will scroll through the program
list. You can also change programs using the cursor buttons (the arrow buttons to the right of the
display), or the Plus/Minus buttons under the Alpha Wheel. To save time, you can enter the
program number directly from the alphanumeric buttonpad to the right of the Alpha Wheel,
pressing the Enter button to complete the selection. If you make a mistake, press Clear, then
start over.
The K2661 has various settings for responding to MIDI Program Change commands from
external sources. These are explained in Chapter 10, so we won’t go into them here. You should
be able to change programs by sending Program Change commands from your MIDI controller.
If you don’t hear anything, see the troubleshooting section in the Musician’s Reference. When
you’re ready to start doing your own programming, check out Chapter 6.
Setups
Setups are preset combinations of programs. Setups can have up to eight zones, each of which
can be assigned to any range of the keyboard (overlapping or split). Each zone can have its own
program, MIDI channel, and MIDI control assignments.
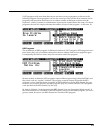
Press the Setup mode button to the left of the display. Its LED will light, telling you that you’re
in Setup mode. Notice that the Setup-mode display is similar to the Program-mode display. If
the setup has three or fewer zones, the box at the left shows you the programs assigned to each
of the setup’s three zones, and which MIDI channel is used for each program. If the setup is
composed of more than three zones, then the box displays a series of horizontal lines illustrating
the approximate key ranges of the zones. See page 7-1 for a more detailed description.