


7-4
Setup Mode
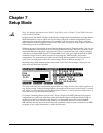
their color), the setup contains just four zones. Whenever you’re in Setup mode, the
number of lines in the info box matches the number of zone-status LEDs that are lit.
Red Soloed zone. As you might have guessed, only one zone can be soloed at a time. When
a zone is soloed, only that zone plays notes and generates controller information.
Other zones, if they’re not turned off, still generate program changes and
entry/exit controller values.
Green Active zone. As long as no other zone is soloed, an active zone plays notes— and
generates controller information, program changes, and entry/exit controller values.
If another zone is soloed, an active zone is “backgrounded”—it’s status LED remains
green, but it doesn’t play notes or generate controller information.
Orange Muted zone. Muted zones don’t play notes or generate controller information, but
they do generate program changes and entry/exit controller values.
In performance situations, the zone-status buttons provide a convenient way to temporarily
change the status of one or more zones. This can be very effective for bringing voices and/or
controller configurations into and out of your performance. The best way to get familiar with
this technique is to play with the buttons, as the next few paragraphs describe.
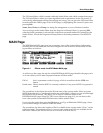
Select a setup (look for one with lots of active zones that cover the whole keyboard), and play a
few bars. You’ll hear sounds corresponding to each of the active zones (green LEDs). If you see
any muted zones (orange LEDS), press their zone-status buttons, and they’ll become active. Play
around a bit. Try muting all the zones, then bringing them back one by one until all the zones in
the setup are active.
Now press the Solo button. The Solo-button LED lights (it’s always red), and one of the zone-
status LEDs (never more than one) turns red. You’ll now hear only that zone as you play. All the
active zones are now backgrounded—they’ll still generate program changes and entry/exit
controller values, but you won’t hear anything from them.
Now press one of the zone-status buttons. Its LED turns red, and it becomes the soloed zone.
The previously-soloed zone returns to its programmed status. Solo each zone in turn, using the
info box in the display to find the range covered by the zone. Note that you can solo a zone even
if it’s muted. Press the Solo button again, and its LED goes out. The previously-soloed zone
returns to its programmed status, and you can hear all the active zones again.
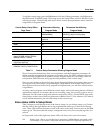
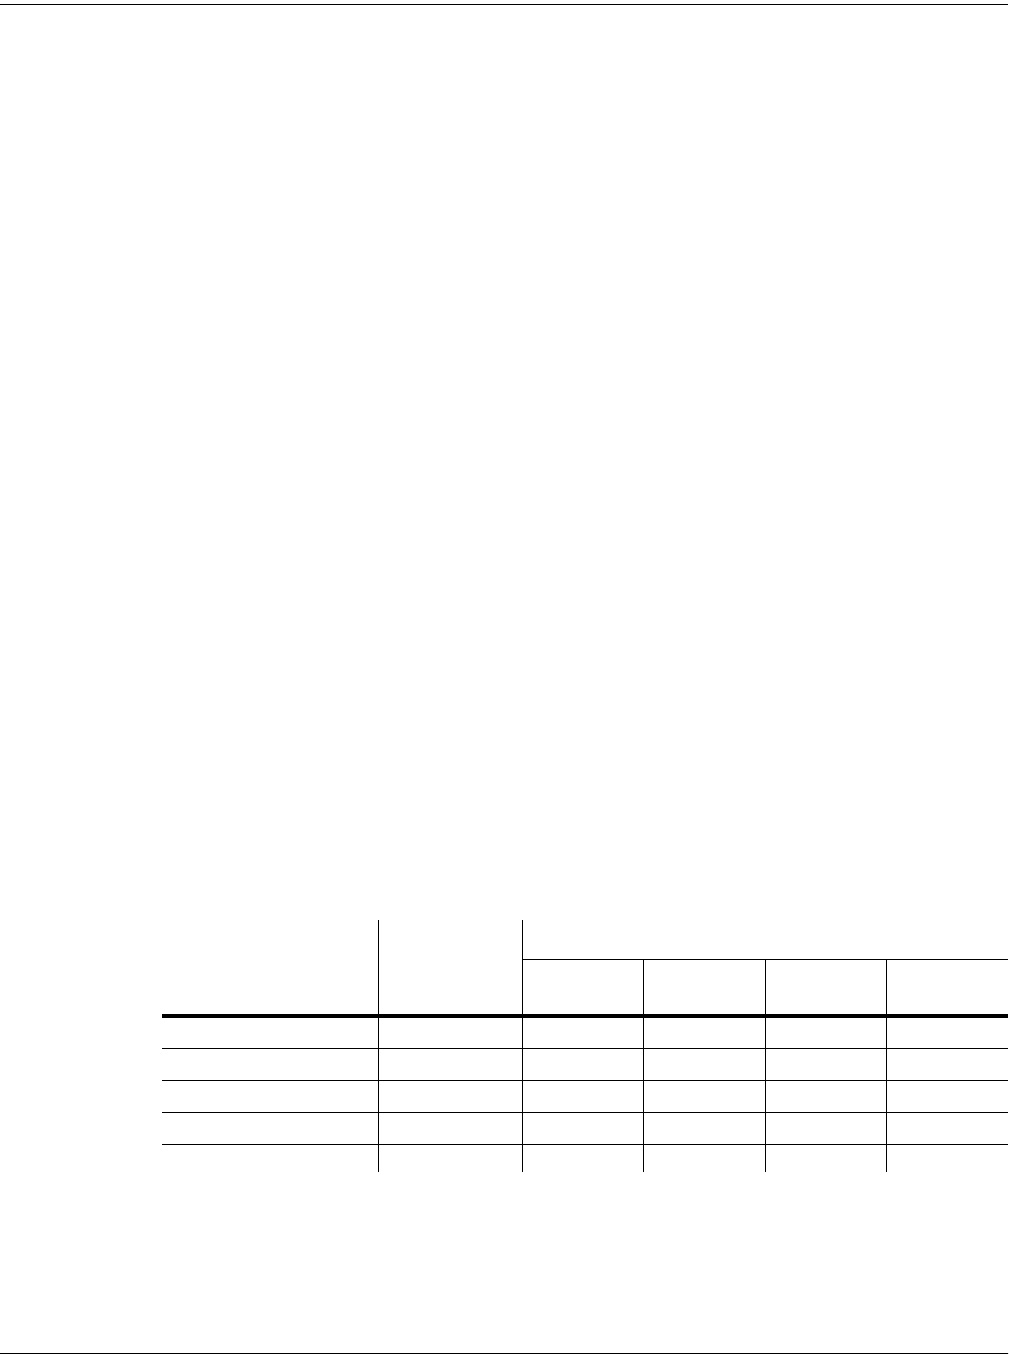
Table 7-2 gives you a quick visual reminder of how zones behave depending on their status.
Remember that any changes you make to zone status in Setup mode are temporary; as soon as
you select another setup, that setup’s programmed zone status takes over. To change a setup’s
zone status permanently, use the Setup Editor .
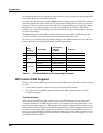
LED Color
Zone
Status
Data Generated by Zone
Notes Controllers
Program
Number
Entry and
Exit Values
Red Soloed
✔✔✔✔
Green (no others are red) Active
✔✔✔✔
Green (another is red) Backgrounded
✔✔
Orange Muted
✔✔
(Off) Empty
Table 7-2 Zone Status in Setup Mode